The Art of Exposing Film
This post covers the fundamentals of exposing film emulsions, kicking off a series of periodic columns about shooting and working with film.
Contrary to what has been bellowed from the rafters since the 1950s, film is very much alive. While digital origination has supplanted film for most motion-picture production, film has seen a resurgence of usage in recent years — even among independent projects. While veteran cinematographers are well-versed in the required skills, the newer generation may never have had the opportunity to expose film.
This Shot Craft post covers the fundamentals of exposing film emulsions, kicking off a series of periodic columns about shooting and working with film.
Visualizing Exposure
While digital cinema cameras have been carefully designed to emulate the same principles involved in exposing film, there are areas where the two mediums deviate, including exposure.
Digital camera systems, even those shooting in raw format, provide a near WYSIWYG (“what you see is what you get”) system of viewing on a professional monitor, which in turn provides filmmakers on set with an extremely close approximation of a final image. While modern film cameras often feature HD video-assist modules that provide a high-definition color image from the camera’s video tap, such a setup is not necessarily representative of either the film’s exposure or the final image — it’s simply a tool that allows the director and cinematographer to share the in-camera composition with other production personnel. The onus is on the cinematographer to visualize how the film will respond to the scene being photographed, and to imagine what the final image will look like.
“One of the wonderful aspects of film is its versatility and flexibility.”


With video-assist modules, there are no integrated exposure tools such as waveforms, histograms, false color, zebras or clip guides to assist you in exposing the image. Instead, you must know the latitude range and responsiveness of the emulsion and be capable of predicting the film’s response to your lighting and exposure scheme. The best way to learn this is to test. One absolute necessity is the use of a light meter — a technique that has fallen out of common practice in the digital era, but one that is definitely mandatory when shooting film (see Shot Craft, AC Dec. ’17 and April ’18). You must be able to quantitively measure the light values of your scene and determine where on the film’s characteristic curve you’ll place those values.
The beauty of film is that in the more than 130 years since its invention, the medium has evolved to become extremely versatile and forgiving in its exposure latitude, and very lenient and flexible in terms of exposure precision.
Emulsion Ratings
All film stocks are rated for their sensitivity to light. From the earliest days of filmmaking, there have been a number of calibration systems — the ASA (American Standards Association, which later became the American National Standards Institute, aka ANSI) was the ubiquitous standard in the United States from the early 1940s until the mid-1970s, when it was replaced by the ISO (International Standards Organization) system. This latter standard follows the same principles as the ISO employed in digital cinema cameras: The higher the number, the greater the emulsion’s sensitivity to light. However, film stocks do not offer the option of electronic gain, so you can’t just increase your stock’s sensitivity with the flick of a switch. A film stock has a fixed sensitivity — well, sort of.
One of the wonderful aspects of film, as noted above, is its versatility and flexibility. Many cinematographers who shoot (or shot) film would not necessarily rate their stock at the factory setting. By rating the stock at a different ISO, the cinematographer can “build in” a certain amount of over- or underexposure and creatively affect how the film stock records images. For instance, if you’re working with a 500-ISO stock and you set your meter to 250 ISO, you’re “building in” an overexposure of 1 stop. If you set your meter to 1,000 ISO, you’re building in an underexposure of 1 stop. In my days of shooting film, I routinely overexposed my stocks by 2/3 of a stop. For a 500-ISO stock, I would rate at 320 ISO and build in a bit of overexposure to give myself a denser negative and provide more options for image manipulation in post.
“Rating” the emulsion, as referred to here, means playing a bit of a game. Because you’re adjusting your meter to a different ISO setting than the film, you’re pretending that the film has that sensitivity and are exposing thusly. While this same result can be achieved by rating the emulsion at its factory setting and then adjusting the exposure as needed through mental calculation, you can apply your exposure variation in a more uniform manner by setting your light meter to the desired rating.
You can compensate for this over- or underexposure in postproduction. When I built overexposure into my negative, it didn’t mean that the result was a brighter image; the result was proper exposure with more information recorded onto the negative. Overexposing allows more light to activate the silver-halide crystals and form increased detail in the image. To render the overexposed scene properly, a gray card shot at the head of a scene really came in handy. The dailies colorist would see the gray card and adjust the Hazeltine (a device for color timing negative for print) so that the brightness value of the gray was proper medium gray. This is known as printing “down” (from an overexposed negative) or printing “up” (from an underexposed one) by adjusting the amount of light that was cast through the negative onto the print stock. In digital postproduction, film scanning often incorporates multiple passes of each frame of the negative to extract the full dynamic range possible; the colorist can then adjust the gain of the image to render a “normal” exposure.
Overexposing a negative creates a “thick” negative, where the silver-halide crystals have received more light than they “expect” overall. This produces deep, crushed blacks, as well as increased contrast, color saturation and grain.
Unlike digital, overexposure on a film negative can actually create more detail in the highlights. When you overexpose a sky, you can “print down” to get more details in the clouds than if you had normally exposed the negative. The thicker the negative is, the more details you can get from the highlights.
Underexposing a negative creates a “thin” negative where the silver-halide crystals have received less light than they expect overall. This results in a reduction of contrast and color saturation, and a raised or milky black — as well as a reduction in the appearance of grain (to a certain point, as too much underexposure can increase grain when printing up significantly). This strategy can also reduce highlight details while providing more detail in the shadows.
Time in the Soup
In addition to varying the amount of exposure you can give a negative, you can also vary the amount of time the negative spends in the developer.
If you’ve overexposed your negative, you can pull process the film, shortening the time it spends in the developer bath. This can equalize the overexposure effect. Pulling a normally exposed negative, however, can result in a thin negative with less contrast and color saturation, as if you had underexposed to begin with. Pull processing typically results in a reduction of grain, image contrast and color saturation, as well as lifted blacks.
You can increase the time in the developer bath — or push process — to get even more image out of an underexposed negative. This was a common technique when cinematographers were losing daylight and needed help gaining more sensitivity from the film stock — they could push process and gain an extra stop of latitude or more. Push processing increases the grain, contrast and color saturation, while strengthening blacks.
These intermixed steps — under- or overexposing the negative and under- or over developing — offer the cinematographer a great deal of creative choice for the resulting image.
“The onus is on the cinematographer to visualize how the film will respond to the scene being photographed, and to imagine what the final image will look like.”
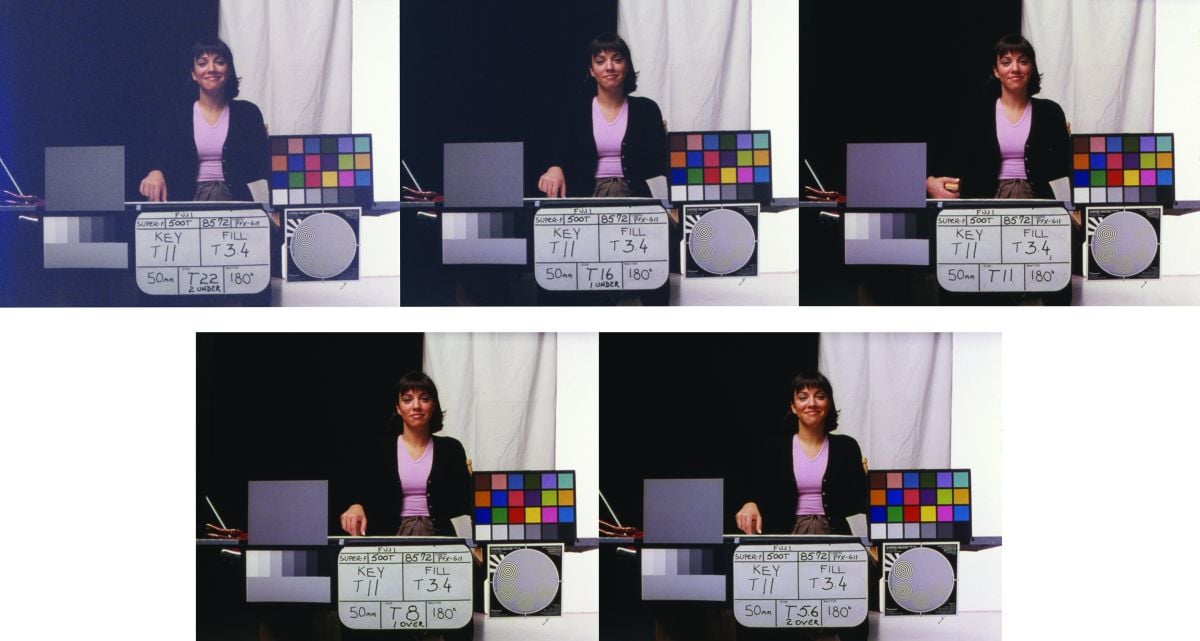
The images above are from an April ’00 AC article for which I tested all of the available Fujifilm film stocks — exposing each normally and also underexposing and overexposing by 1 and 2 stops. (Click here for a high-res image.) The film was printed under extremely precise conditions by Deluxe Laboratories, employing a densitometer to get exact results in the middle-gray chart on every iteration. In the following month’s issue (AC May ’00), future ASC member Christopher Probst tested all of the available Kodak film stocks in exactly the same manner.
In comparing these images, you’ll see the subtle yet powerful differences that can be achieved by simply under- or overexposing your negative.
Jay Holben is an ASC associate member and AC’s technical editor.
You’ll find all Shot Craft posts here.
