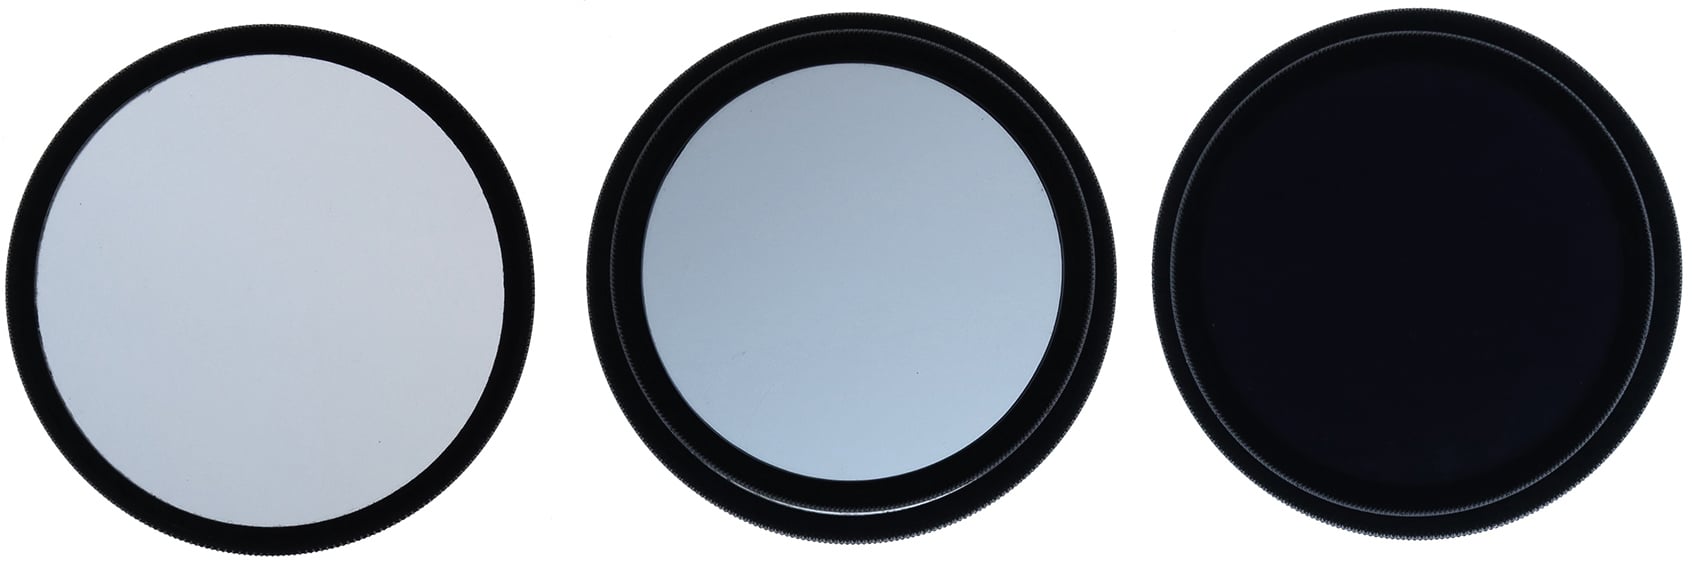
Understanding Polarizing Filters
The effects of these special filters cannot be easily mimicked with digital tricks, making the understanding of their use important for every creative cinematographer.
In the modern digital age, many traditional, glass photographic filters are falling out of vogue because their effects can be easily replicated — arguably with greater precision and speed — in the color suite. This is especially true when it comes to color grads or color-effect filters, but even diffusion filters can be re-created in post, at least to a certain degree, and in some cases allowing for greater flexibility with the desired effect.
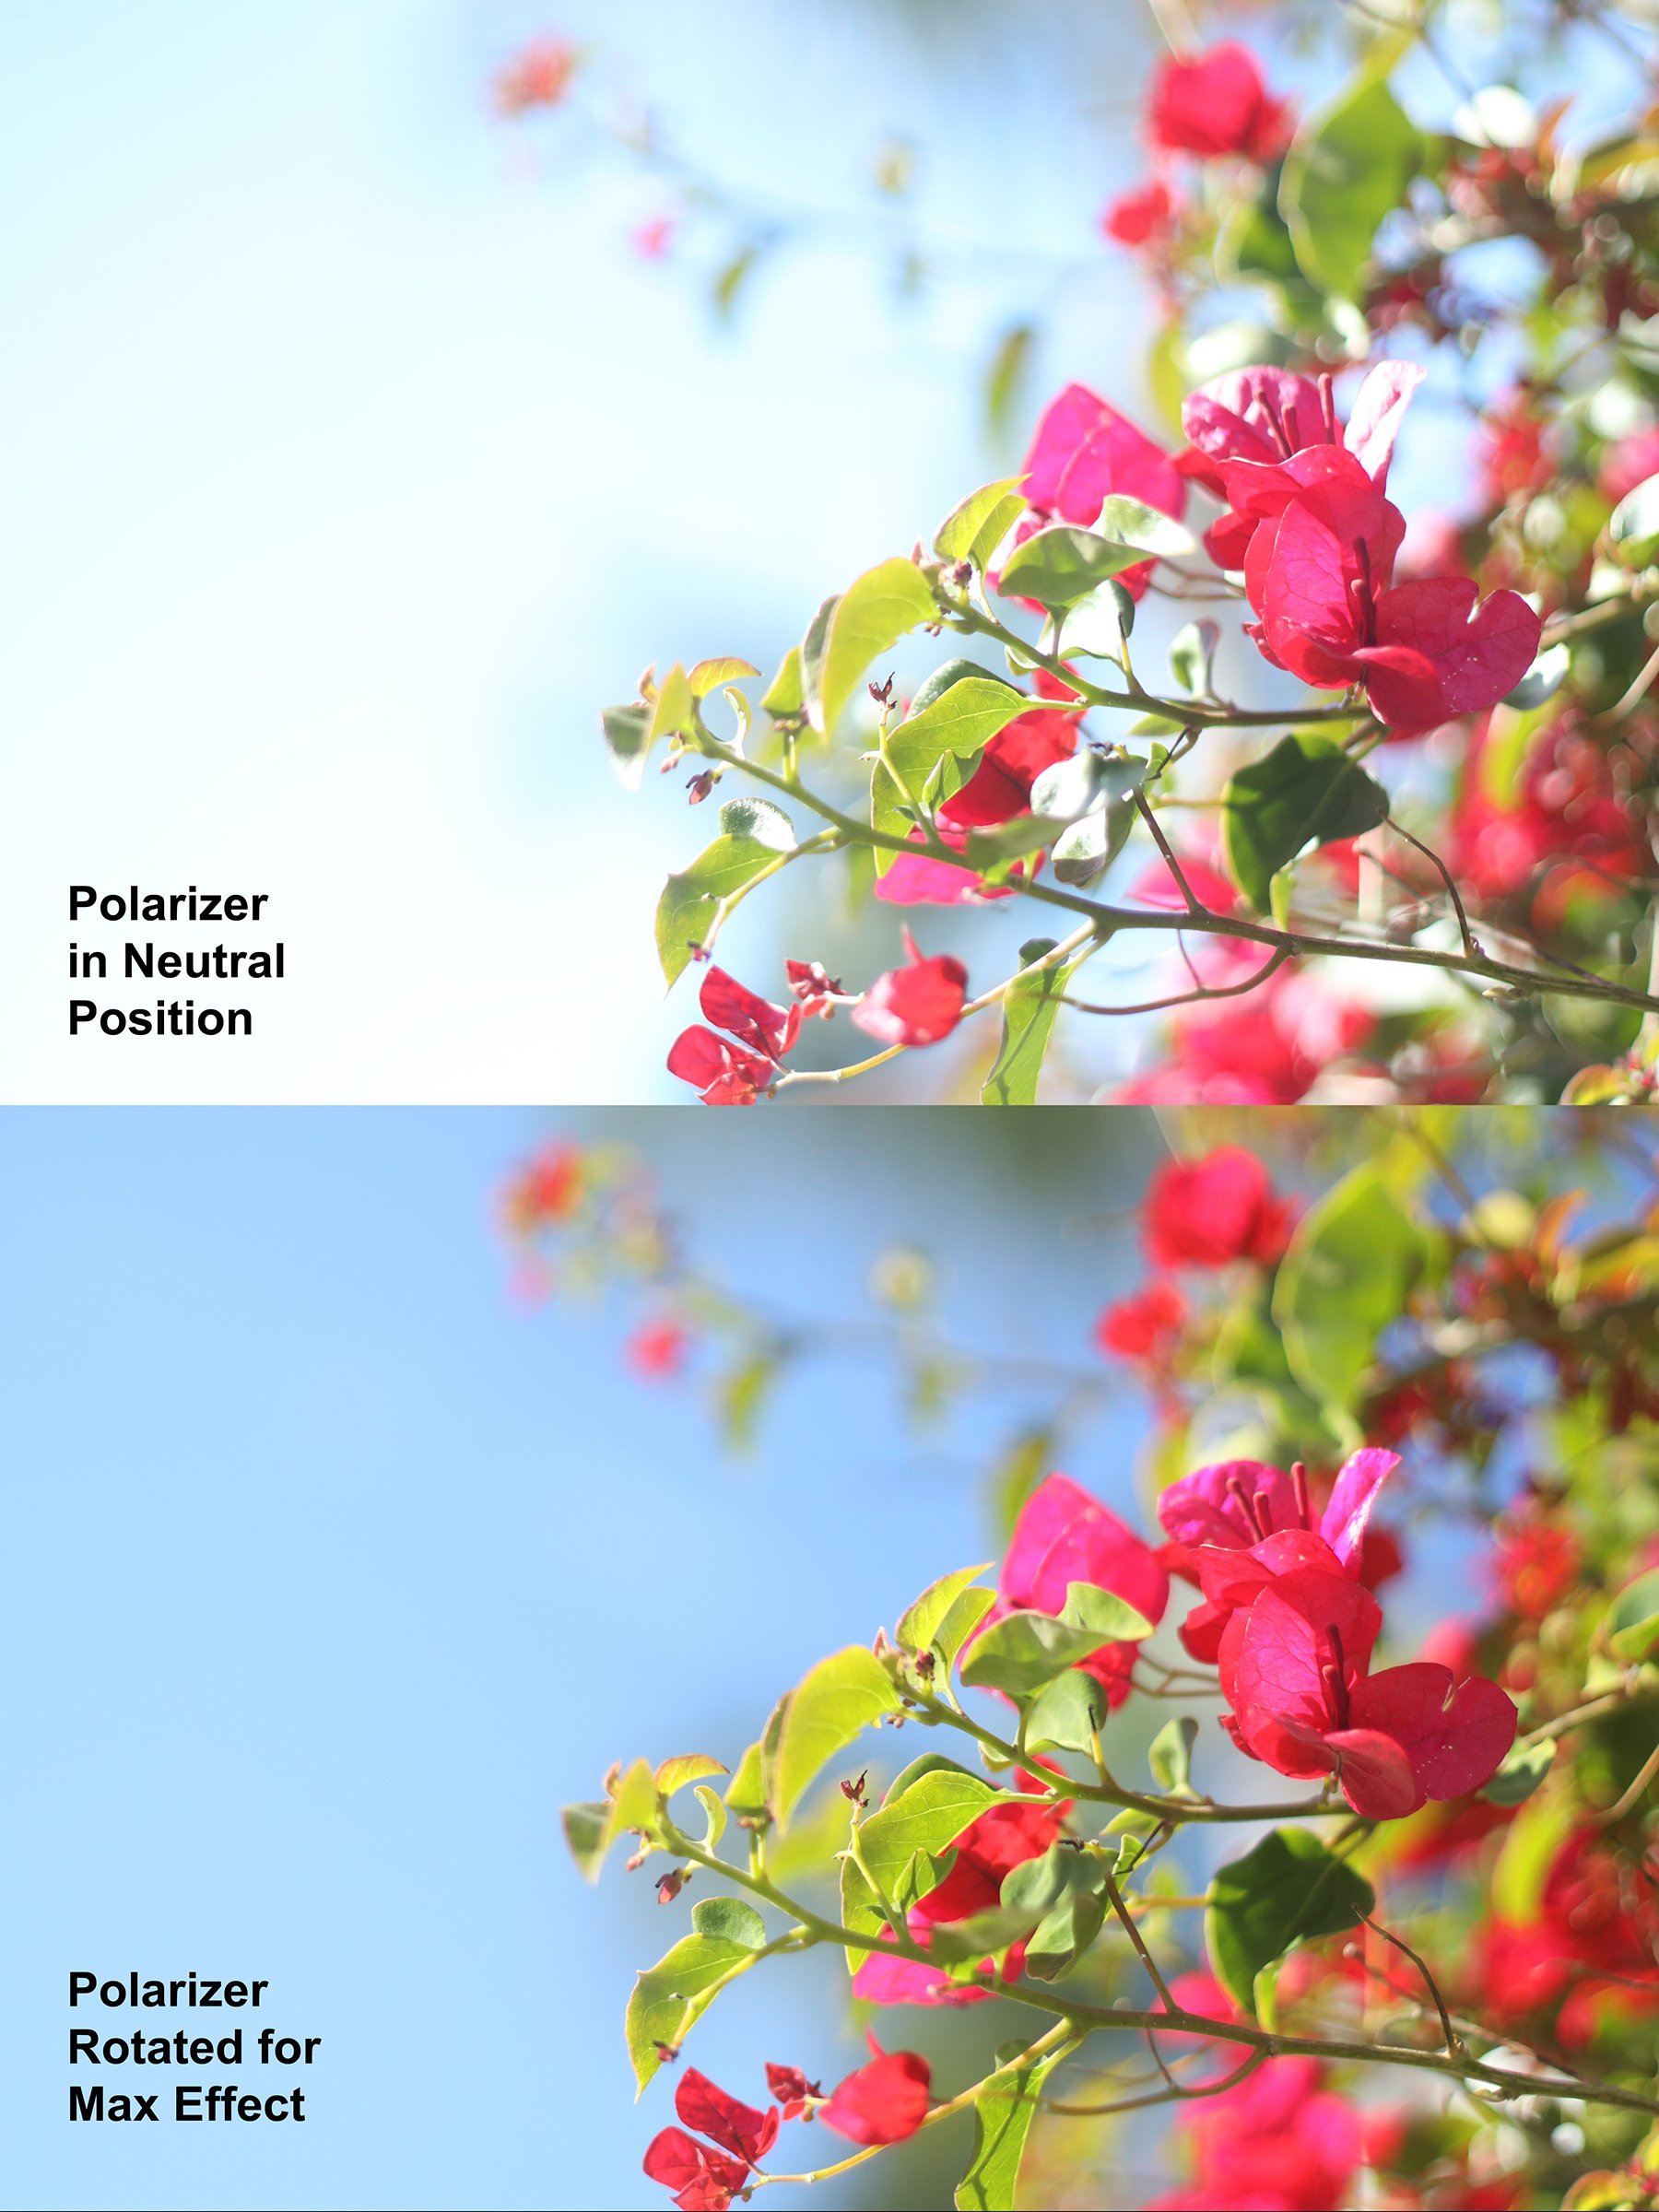
The polarizer, however, is a special filter, and its effects cannot be so easily mimicked with digital tricks. Those effects include the darkening of blue skies (at a certain angle), the brightening or saturating of some colors (especially greens), and the elimination of some reflections. While darker skies and increased saturation can be realized in a grading suite, eliminating reflections can’t be done in post without computer-generated effects.
The Science
So how does a polarizer actually work? Answering that question requires some discussion of physics.
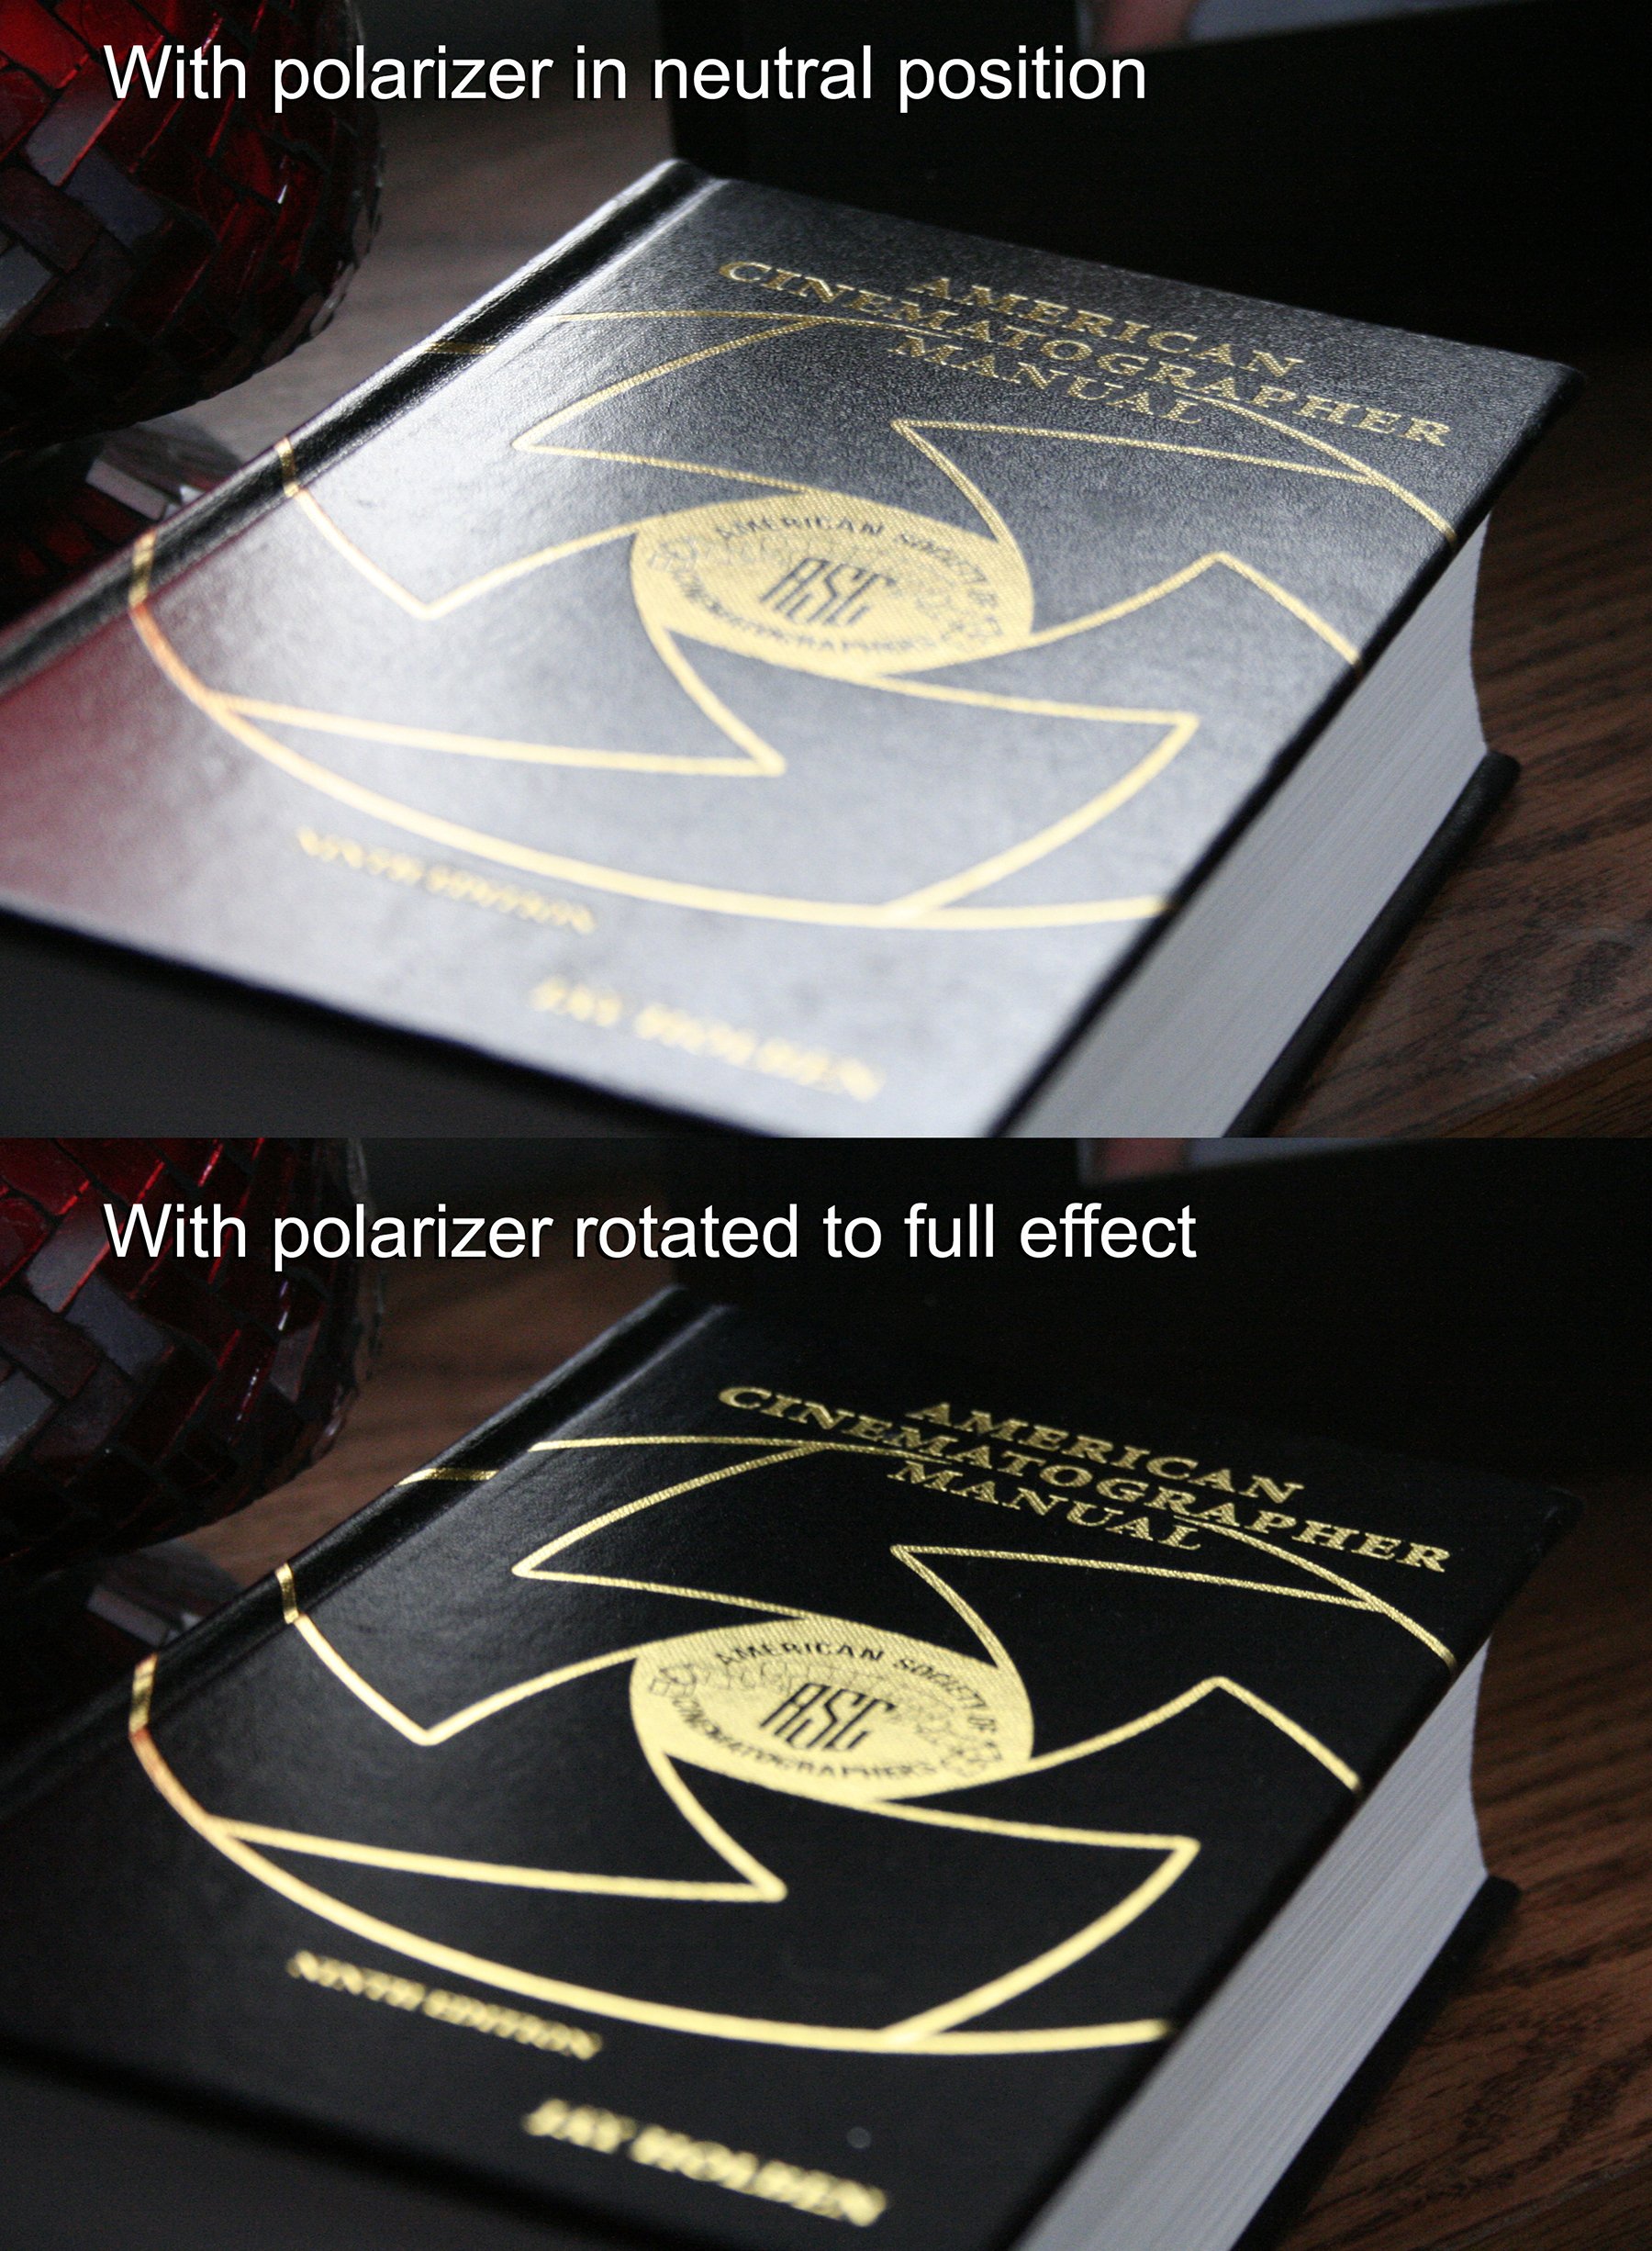
Remember that light behaves in two ways: as a particle and as a wave. In discussing polarizers, we’ll be focusing on the wave behavior. When light emanates from a source, such as the sun or a light bulb, it radiates in all directions equally. When those waves of light strike a flat object, especially one with a high-gloss surface, they are reflected off that surface in a polarized fashion, meaning that the light now radiates primarily in one direction instead of all directions equally. To our eyes — and to the camera — this is typically seen as an intense highlight-reflection of the light off of the reflective surface.
Because there is now polarized light mixed in with non-polarized light, we can separate out the single-plane polarized light with a polarizing filter.
The polarizing filter features a dichroic absorbing layer sandwiched between two layers of glass. The dichroic layer, sometimes called “pola foil,” is made from polyvinyl alcohol (PVA) plastic that is stretched during manufacturing, forcing the molecules in the plastic to line up in long parallel chains with tiny gaps between them — think of the bars of a jail cell, or a picket fence. These chains are invisible to the naked eye. This stretched polymer is then dipped in a solution of iodine, and the iodine molecules attach themselves to the polymer chains. The resulting structure allows the pola foil to absorb light waves that are parallel to the long chains while allowing waves that are perpendicular to pass through unaltered.
The original polarizing filter was designed by Polaroid — the same company that went on to make instant film cameras — in 1929 and then revised to its current form in 1938. For all intents and purposes, polarizing filters have remained unchanged for the last 80 years.
glossy surfaces.
Polas in Action
To visualize how a polarizer affects light, first imagine two children holding a jump rope that’s stretched between them. One child shakes the rope up and down, creating a sinusoidal wave that runs the length of the rope in a single plane. Now imagine that the rope runs between the slats of a picket fence — the parallel chains of the pola foil — with one child on either side of the fence. When one of the children shakes the rope up and down, the wave that’s created will pass through the slit in the fence to the child on the other side; however, if the first child shakes the rope from side to side instead, the resulting wave will be stopped by the fence and won’t transfer through to the other child.
This is, in effect, what happens with a polarizing filter. (In actuality, a polarizer absorbs light that is in the same orientation as the chains and lets light that is perpendicular to the chains pass through, but still, the fence analogy works for the general concept.) When the microscopic lines of molecules are rotated into the proper orientation in relation to the polarized light, they block that light from reaching the camera — the pola foil absorbs the light energy. Aside from reducing the light intensity — which we’ll discuss in a bit — the filter has no discernible effect on non-polarized light. This means we can cancel out bright reflections off of surfaces as if they never existed while still being able to see everything else just fine.
It might feel like magic, but it’s really science.
There are caveats, of course. You can’t just magically cancel out all reflections in the world; the ones you can cancel have to be at a certain angle to the camera. Also, light doesn’t necessarily reflect off of a surface in a perfectly polarized fashion; you might not be able to eliminate a reflection completely, but you can still significantly reduce its brightness. And this is true for many different surfaces, not just perfectly flat ones. Water, for example, isn’t perfectly flat, but the undulation of waves (or wavelets) creates momentarily “flat” surfaces that reflect polarized light toward the camera, creating a shimmering effect; polarizers are often put to use to eliminate such reflections.
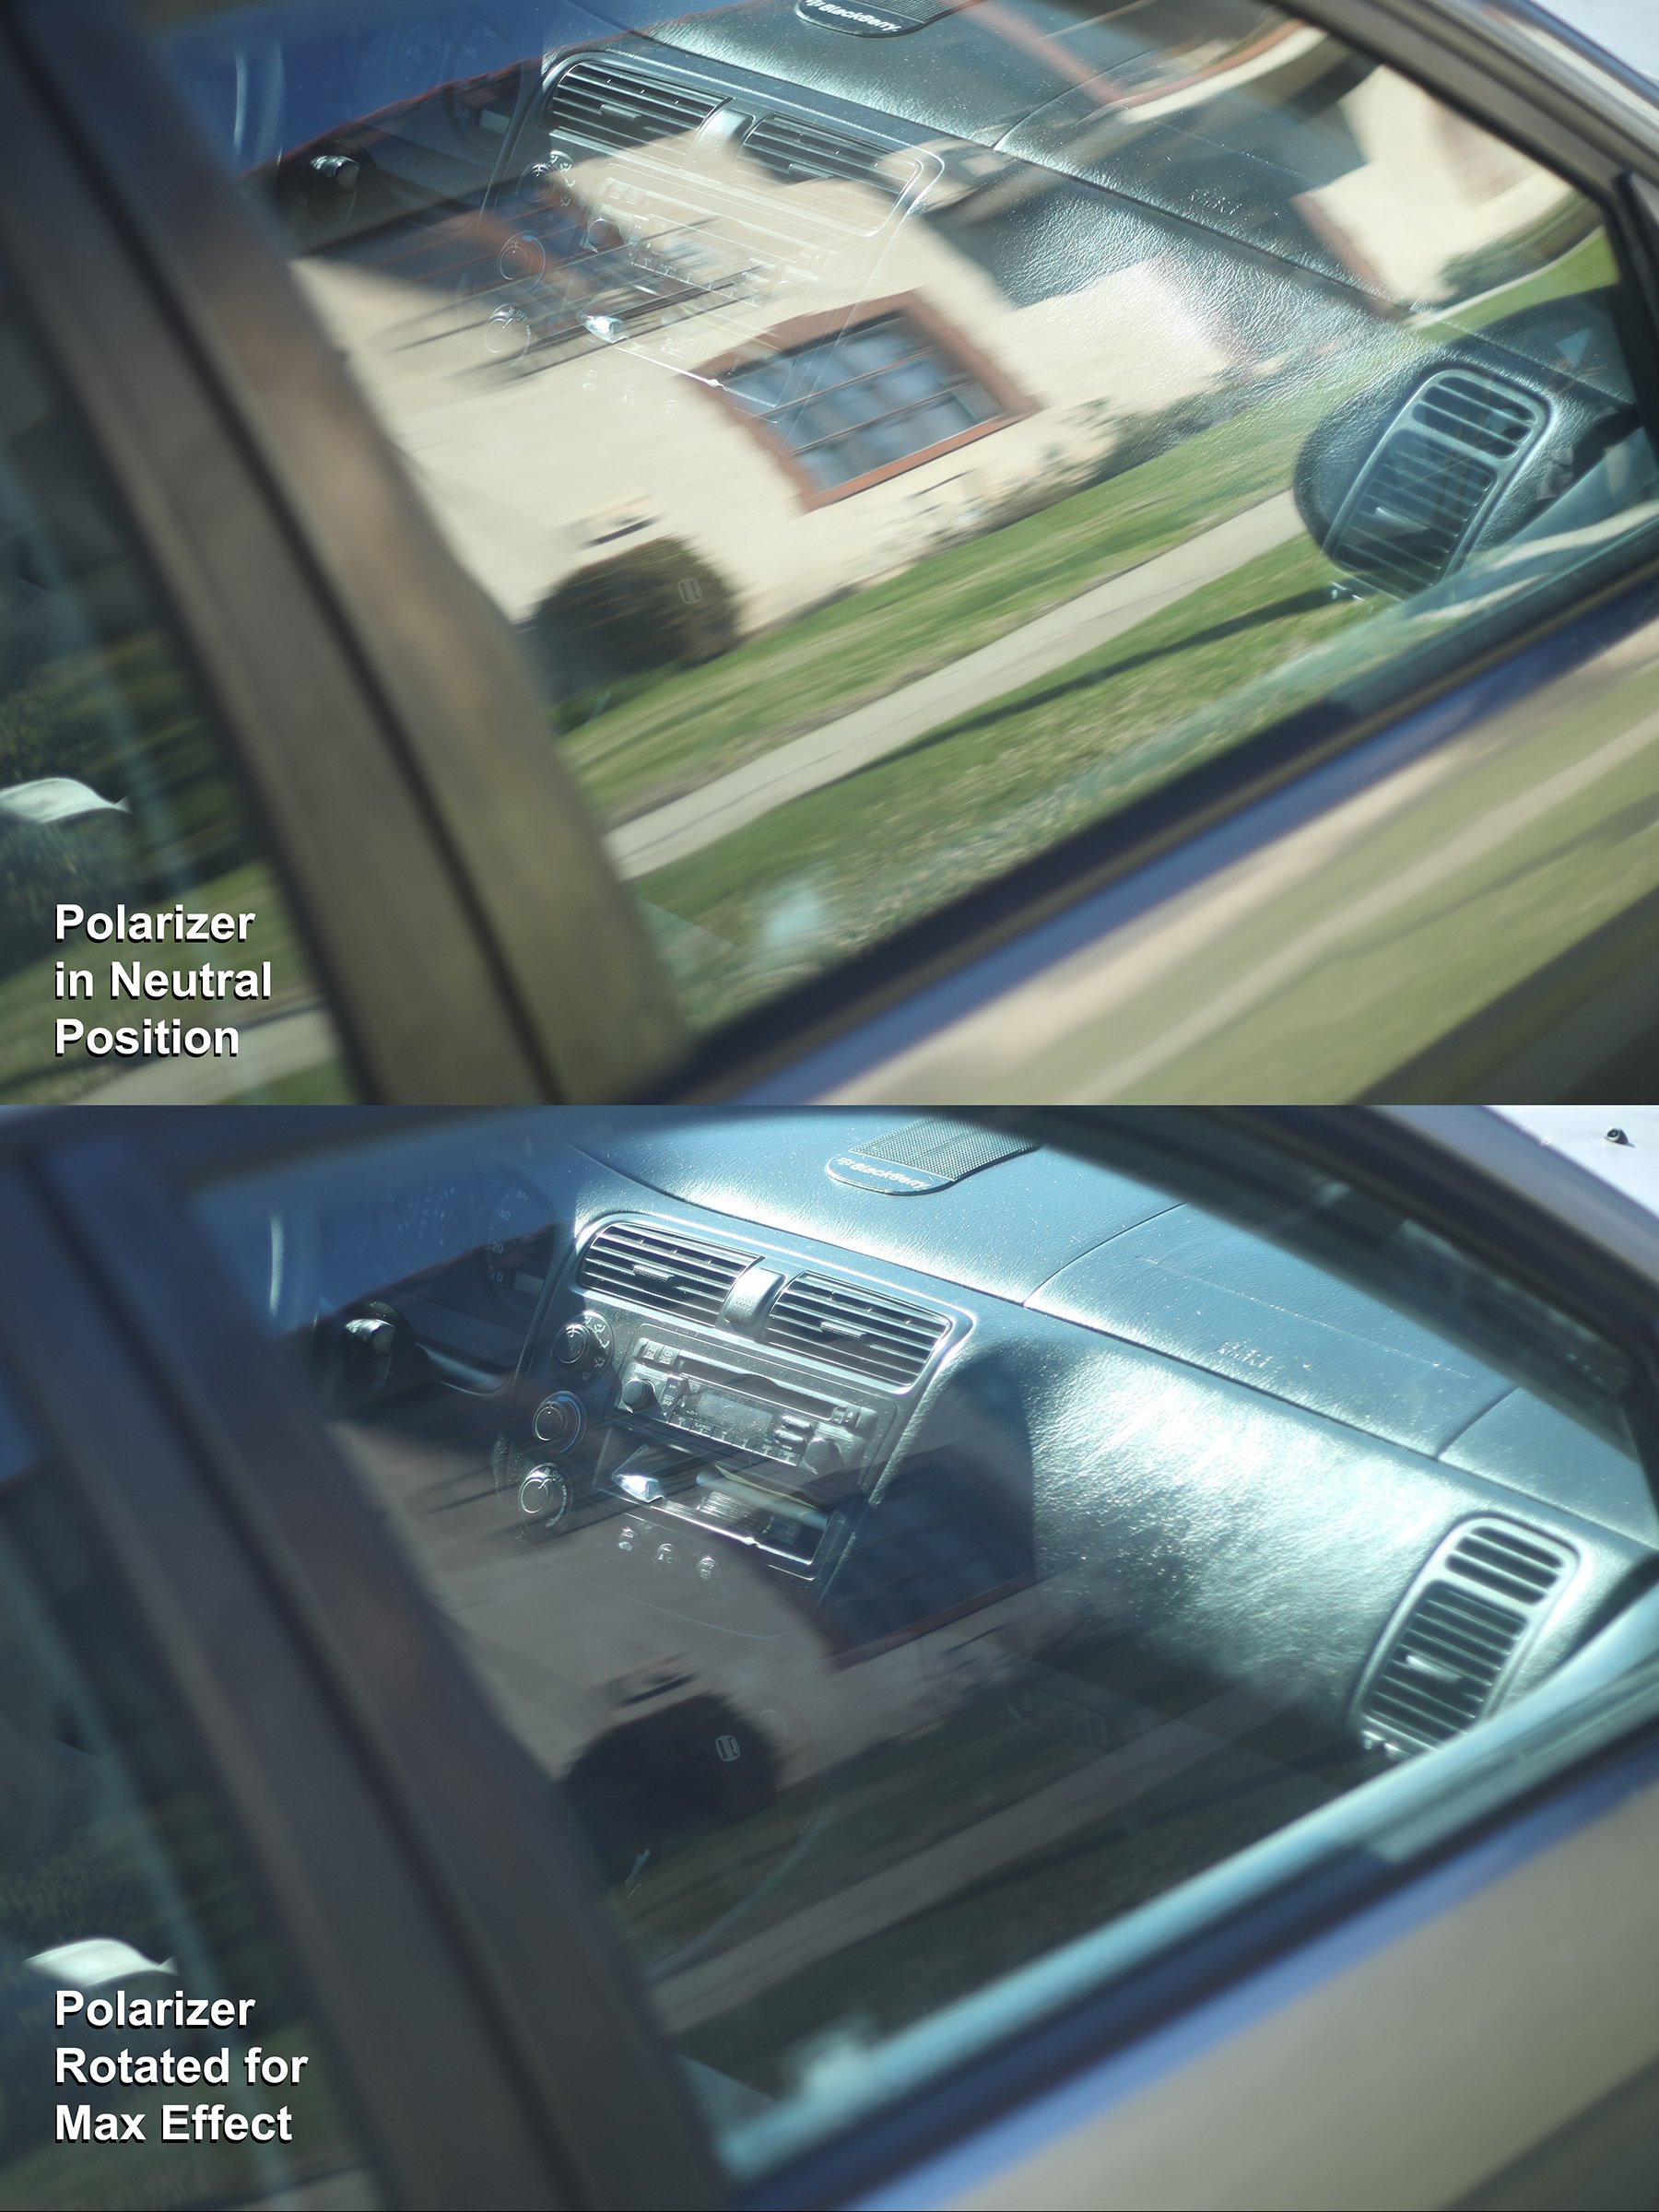
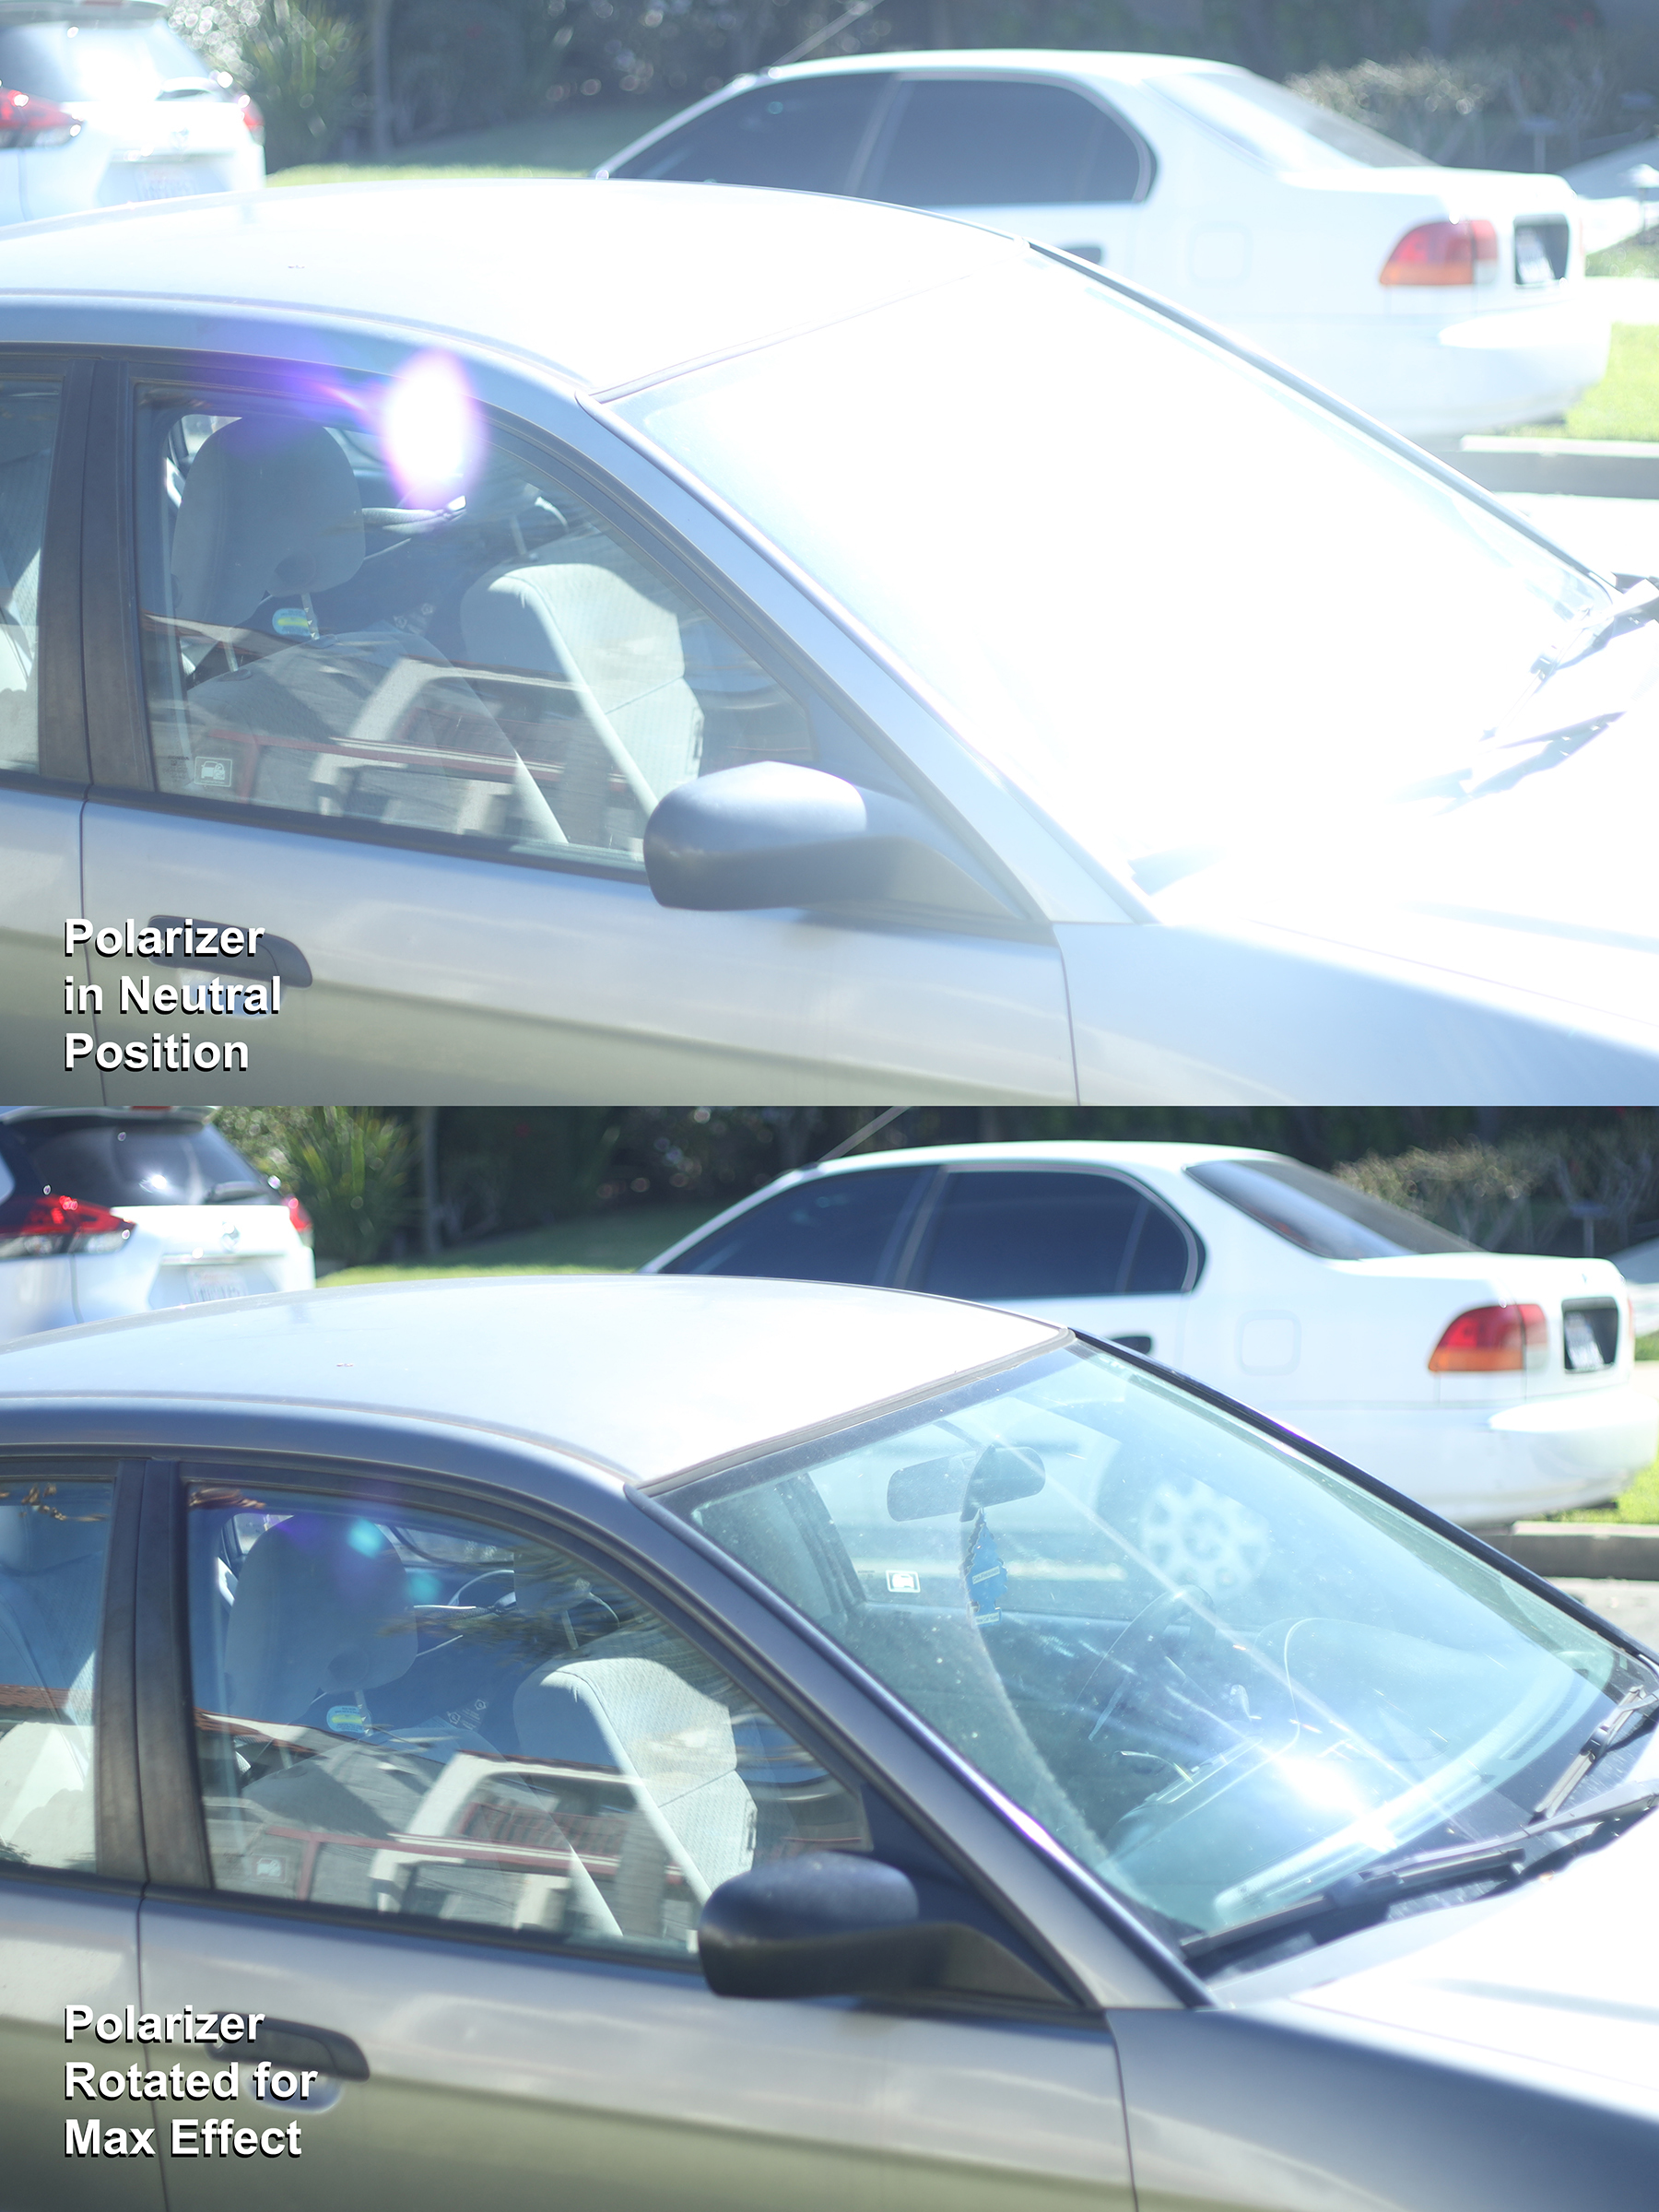
Similarly, bright reflections off of leaves can also be reduced with a pola. Reflections off of windows, windshields, or even a glossy floor can be reduced with a pola. What can’t be reduced, no matter what the angle, are reflections off metallic surfaces — as such reflected light is not in fact polarized, so a polarizer can’t cancel it out. In the photo below, the reflection on the car door is canceled out by the polarizer — but that’s actually the reflection off of the car’s clear coat, not the metal surface itself:
Okay, but how does a polarizer work to darken blue skies?
This has to do with sunlight being scattered by tiny gas particles in the atmosphere — namely, oxygen and nitrogen molecules. Blue light scatters more strongly than other wavelengths, and that's what gives us our lovely blue skies. This scattered blue light is polarized, and therefore it can be reduced with the use of a polarizing filter. When the filter is oriented to eliminate the polarized light, the sky looks darker — less scattered light equals less light “pollution” and, hence, less brightness. This effect is best achieved when the sun is perpendicular to the shot (at a 90-degree angle to the lens). When the sun is positioned either directly in front of or behind the lens, the polarizer will have no effect on the polarized light.
Linear vs. Circular
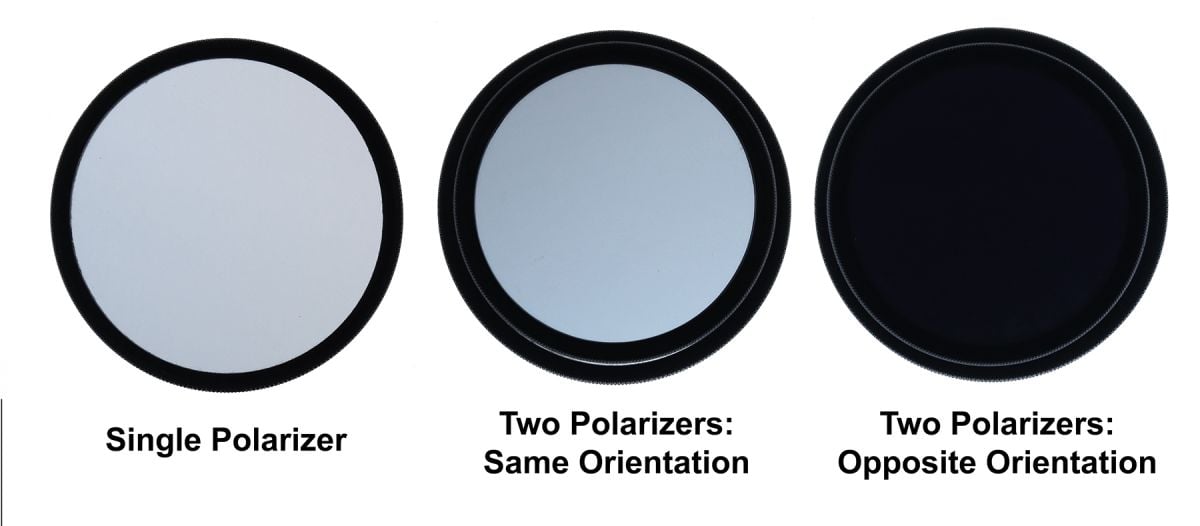
There are two primary types of polarizers: linear and circular. This does not refer to the physical shape of the filter — a circular polarizer may be square or rectangular in shape, and a linear polarizer may be round — but rather to how the light exits the filter and whether or not the filter incorporates an additional type of filtration.
A linear polarizer is simply a polarizer. It works as described above to eliminate polarized light from a specific direction while allowing non-polarized light to pass through. The issue is that once it passes through the filter, the non-polarized light becomes polarized; the filter, like the picket fence, only allows light that is oscillating in one direction to pass through. With most film cameras, this is not an issue — unless there is a videotap on the camera that receives its image via a beam-splitting prism.
However, with some digital cameras, and with cameras that have an auto-focus or auto-exposure feature, this can be a problem. These cameras often feature a beam-splitting prism or partial mirror that diverts light from the lens and sends it to an exposure meter or a secondary sensor for exposure or focusing. This beam splitter or half mirror polarizes light, so if the only light hitting the beam splitter/mirror is already polarized, then it might not be “seen” at all, or its intensity might be misinterpreted, and as a result, the auto-focus or auto-exposure might not function properly.
A circular polarizer solves this problem.
Circular polarizers incorporate a secondary filter — called a “quarter-wave plate” or “quarter-wave retarder” — on the back of a linear polarizer. In essence, this wave plate de-polarizes the light coming through the filter. While this may seem counterproductive, the polarizing filter’s properties are still preserved, while the light that exits the filter is “remixed” to have a more natural orientation for the camera’s beam splitter or partial mirror.
The circular polarizer does this by causing the linearly oscillating light wave to “spin” — this is where the term “circular” comes from, because the light wave takes on a circular oscillation instead of a linear one. As the wave passes through the quarter-wave plate, it is no longer oscillating in one plane, but actually rotating about its axis.
Linear polarizers can also cause problems with three-chip broadcast/ENG cameras that feature dichroic prisms, so it’s safest to use a circular polarizer with those cameras, too. In fact, there’s no downside — other than cost — to using a circular polarizer. It’s generally the safer bet with any camera.

How to Use a Polarizer
Because a polarizer only affects polarized light when it is properly oriented at the correct angle, you have to be able to rotate the filter for it to function properly.
As noted, polarizers come in a round or square/rectangular shape. The round version often has threads that allow it to screw directly onto the front of a lens; the threads can move independently of the filter frame so that, once secured to the lens, the filter can still be freely rotated for optimal use.
Some round-shaped polarizers don’t have threads and instead need to be clamped into a matte box that features a rotating circular stage. Similarly, square/rectangular polas need to be placed in special rotating filter stages in a matte box, or in a rotating filter holder.
There is no specific order in which a polarizer needs to be placed in relation to other filters being used simultaneously. However, most rotating filter stages are at the rearmost position in a matte box, so generally a pola will be placed closest to the lens.
The effect of a polarizer can be seen in the viewfinder or on a monitor, so its orientation can be adjusted after the filter has been secured in place. You can also see a pola’s effect with the naked eye; a helpful technique is to stand next to the camera and look through the filter, rotating it in front of your eye to get a rough orientation for the desired effect before securing it in place. Note that there’s no requirement to use a polarizer at its maximum efficiency. In fact, in some situations, this can look strange or unreal. Among the wonderful benefits of a polarizer is that its effect is adjustable.
If it’s too much, simply rotate it back a bit to minimize the effect to your liking.
If you’re using a circular polarizer, it’s crucial that you secure the filter with the wave-retarder facing the lens; if you place the circular polarizer backwards, it will have no polarizing effect at all. If it’s a round-shaped circular polarizer with threading, then the manufacturer has already oriented the filter correctly for you — it can only connect to the lens in one direction. A non-threaded filter, however, can be oriented either way. There should be a marking on the filter to the effect of “this side out.” Pay attention to that instruction! That labeling also makes for an easy way to tell if a polarizer is circular or linear.
If you’re unsure whether a polarizer is circular or linear and there are no markings to give you a clue, hold the filter up to your eye and rotate it around. If you see the polarizing effect, then you have the right orientation. If you flip the filter around, look through the other side and still see a polarizing effect, then you have a linear polarizer; if there is no polarizing effect when you flip the filter over, then you have a circular polarizer.
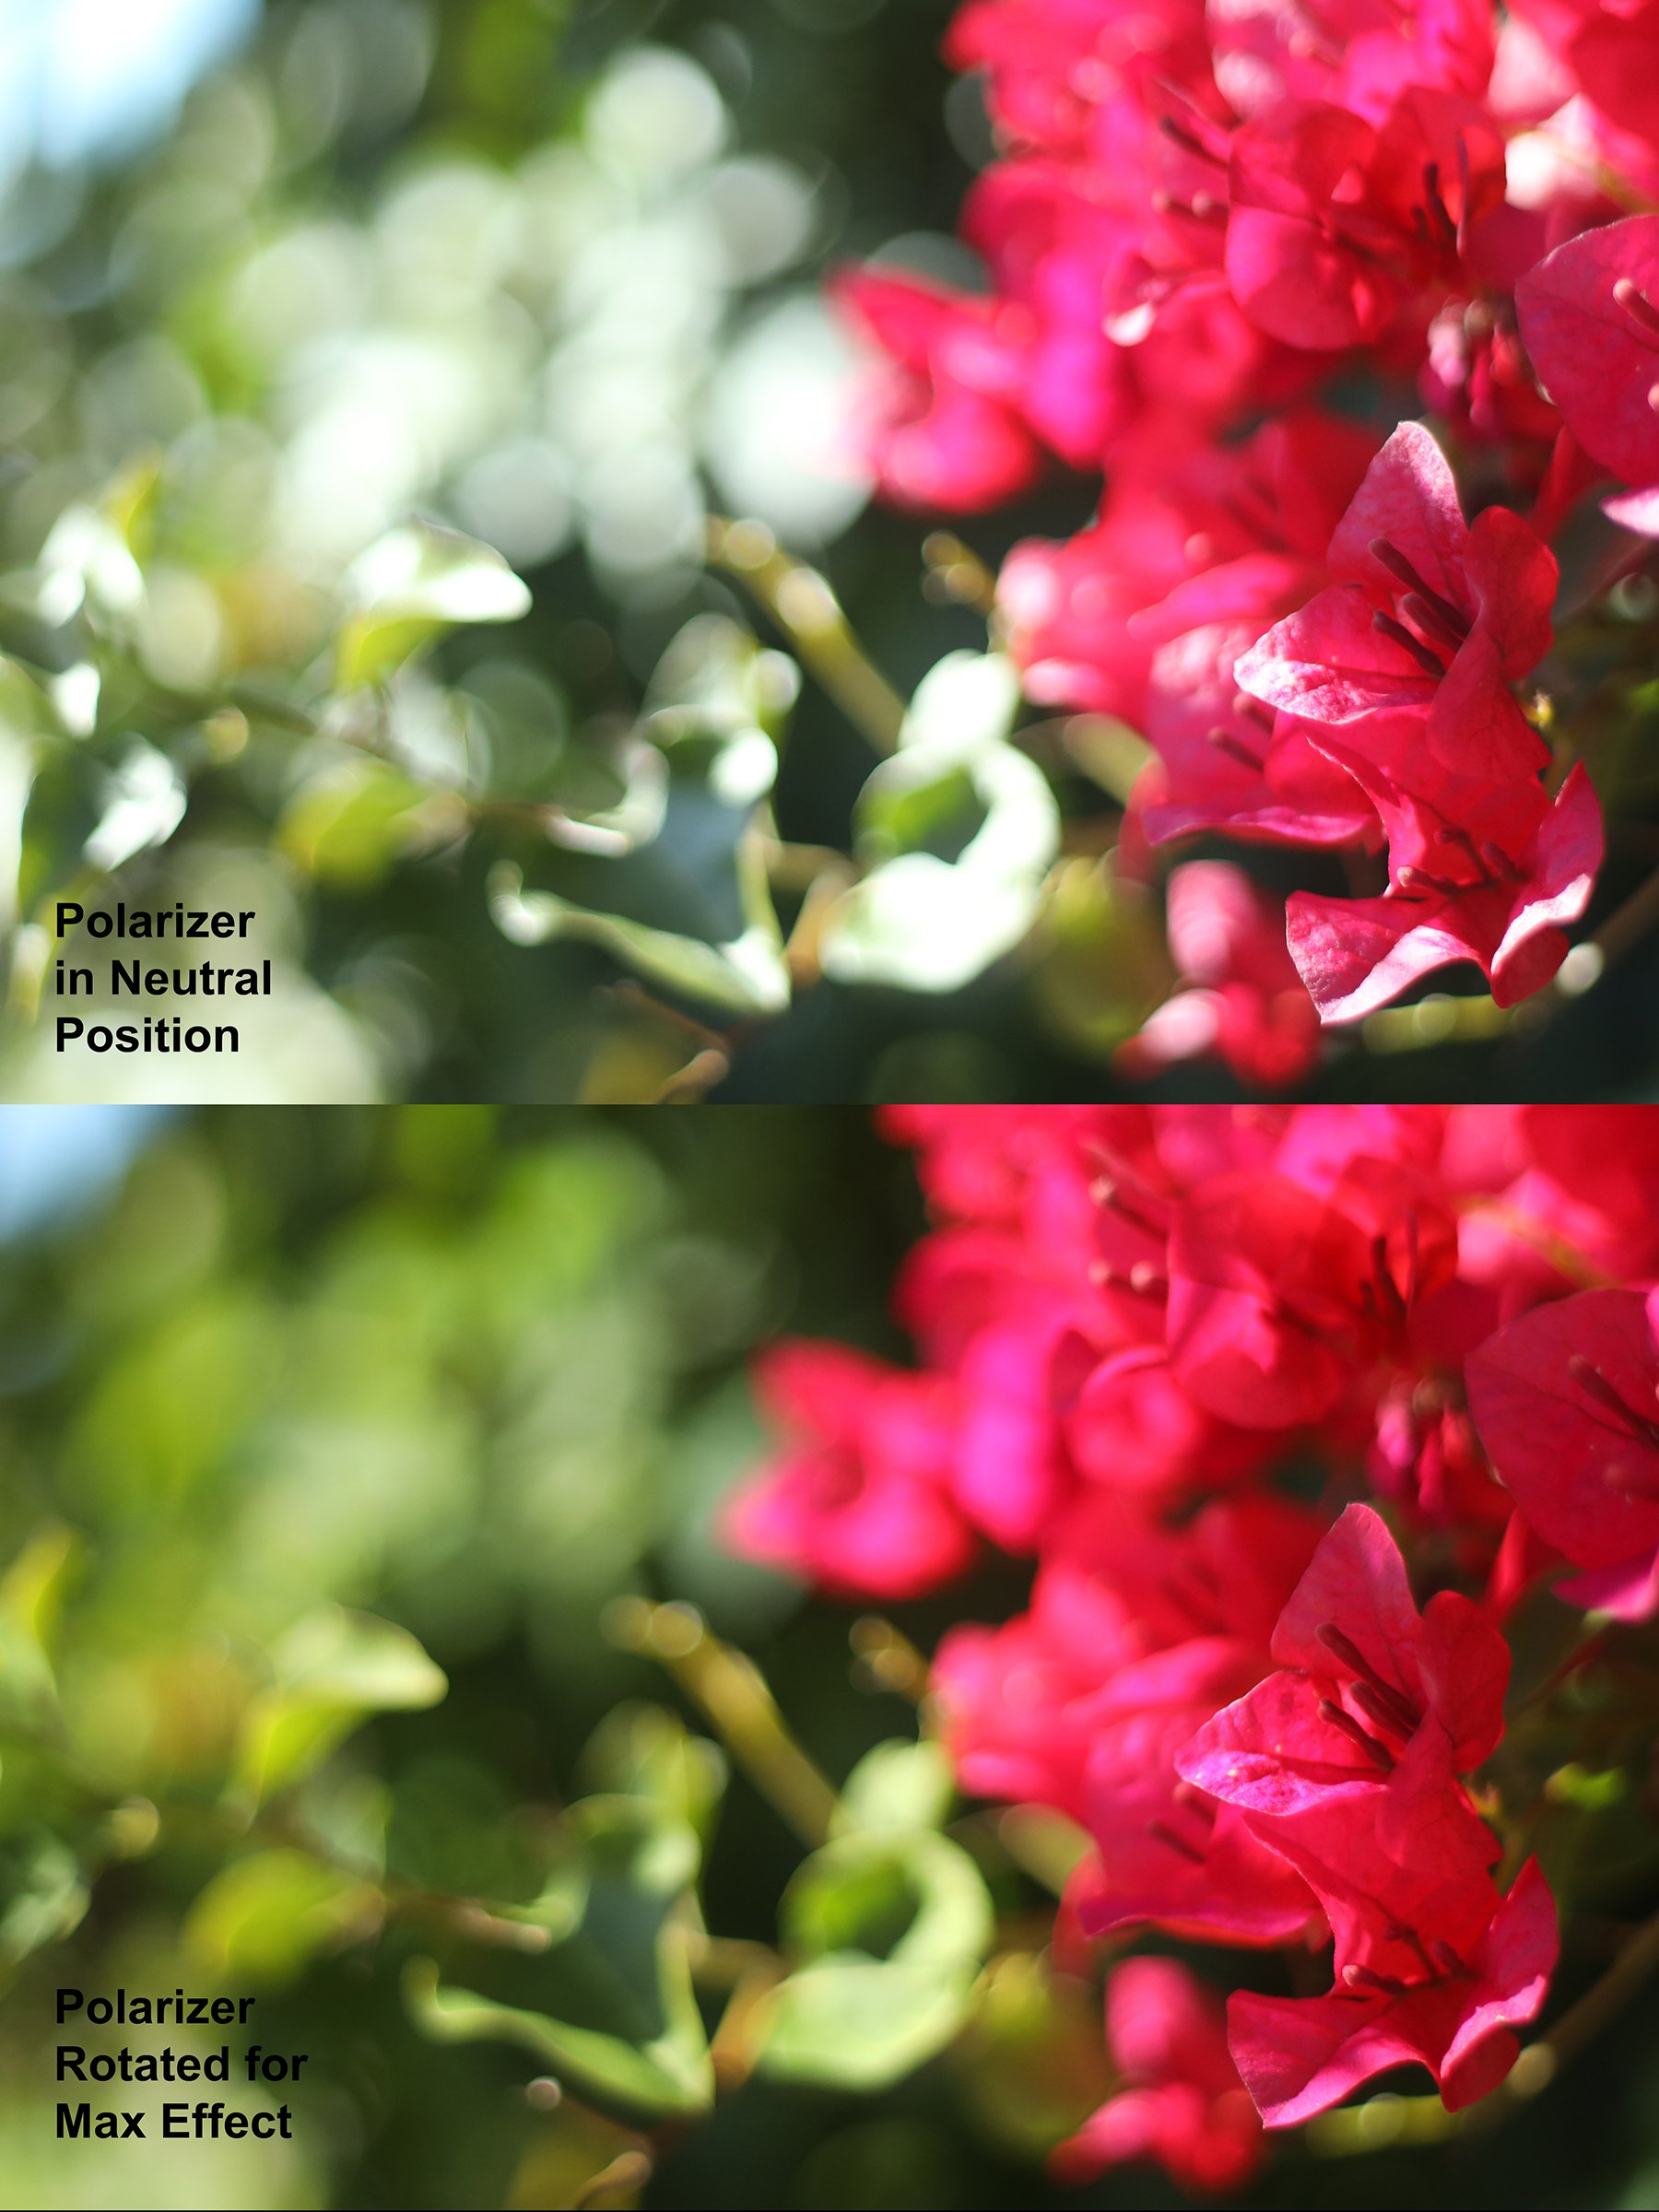
Landscape photographers often incorporate polarizers to increase overall color saturation in the scene by eliminating some or most of the light scatter in the atmosphere that can wash out colors — provided, of course, that they’re shooting at an angle perpendicular to the sun’s position.
Polarizers can also be helpful if you can’t control the images on a computer or television monitor. LED monitors put out polarized light that can often be eliminated with a polarizer, making the monitor appear to be off — black — when it’s actually on.
Some Drawbacks
The biggest liability when using a polarizer is loss of light. When we realize that the filter is absorbing the polarized light, it’s easy to understand that the filter therefore requires a considerable exposure compensation. Polarizing filters absorb about 11⁄2 to 2 stops of light, on average.
Any filters you put in front of a lens create the potential for flares, especially ghost flare. Polas are no exception. Some manufacturers offer polas with optional thin-film anti-reflection coatings that help to mitigate this issue.
When shooting in sunlight, the angle to the sun is critical — and wide-angle lenses can capture so great an angle of view that the effect of the polarizing filter might not be uniform across the frame. If we are using a fisheye lens, for example, with a 180-degree angle of view, the center of the image that is 90 degrees to the sun will show the most effect, but the edges of the image that are parallel to the sun will have no effect. Likewise, regardless of focal length, if you’re panning in the shot, the effect of the polarizer will change depending on where the lens is pointing.
Due to the complexity of their manufacturing, polarizers are expensive — especially the good ones. They can easily be the most expensive filters in a kit. The difference in cost from one pola to another is often reflective of the quality of the filter’s glass. More expensive filters utilize higher-quality optical glass and will generally have less color bias on your image, whereas inexpensive polas can impose a green tinge that’s inherent in the glass.
Several manufacturers — including Formatt-Hitech, Lindsey Optics, Schneider Optics and Tiffen — offer polarizers for motion-picture use, and many more for still cameras. In some cases you can find a “one-stop” lower-efficiency polarizer to use in low-light situations, or 3- or 4-stop polarizers that are combined with neutral-density filters.
Tiffen also offers a “Warm Polarizer,” which combines an 812 Color Warming filter to the polarizer to add some yellow/red into the scene.
Additionally, high-efficiency polarizers are available from Schneider (True-Pol) and Tiffen (Ultra Pol).
Examples
This clip above demonstrates the effect of a polarizer eliminating glare off the cover of an AC Manual. While the light coming through the window is scattered in all directions, when that light reflects off of the glossy surface of the book some of that light becomes polarized. That’s the hot glare you see. By rotating the polarizing filter properly, you can cancel out the polarized light and eliminate (or significantly reduce) the reflective glare.
This round polarizer above happens to be of the circular type. Note that when the quarter wave retarder side is turned toward the camera the polarizer works well. If it’s rotated the wrong way, the polarizer doesn’t cut the glare. Instead the results of this particular pola is to change the color of the shot!
This square filter above happens to be a linear polarizer, and this one works well no matter what direction it’s facing.
Images and video courtesy of the author.


