Film Capture for LED-Wall Shoots
Testing celluloid in emissive-display environments.
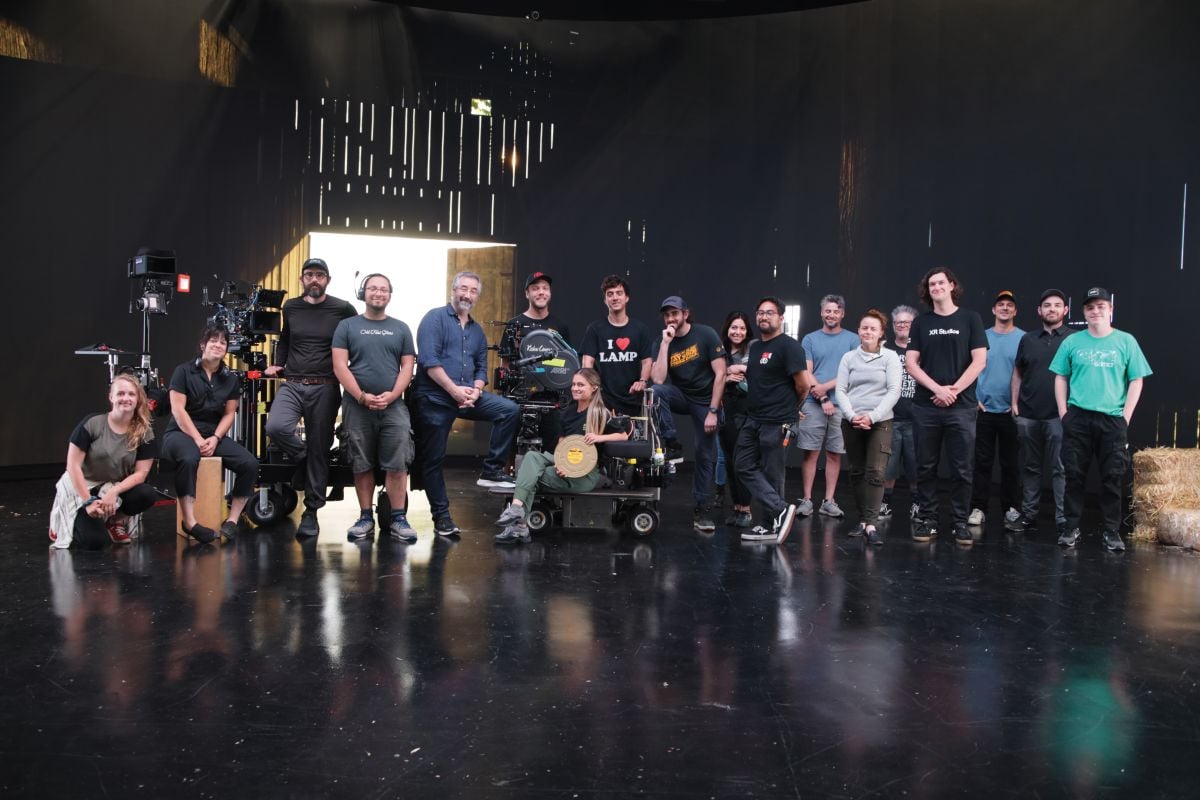
Unit stills by Derek Stettler. All photos courtesy of Jay Holben.
Does shooting film work with LED walls? We’ve conducted a test to answer that question. Cinematographer Kaity Williams and I were in the late stages of developing a feature that Kaity wanted to shoot partly on 35mm, and we were discussing the implementation of OSVP technology. Kaity was curious as to whether incorporating an LED wall into our plans would be possible. At that point, I was aware of one small test conducted in the U.K. on 65mm, and that the Westworld series had incorporated LED walls with film for a number of scenes — and that was about it.
Kodak, FotoKem, Keslow Camera, XR Studios Hollywood, MBS and J.L. Fisher enthusiastically agreed to support our test. Our findings were significant enough that in addition to sharing them here, we will also elaborate on them in a white paper for the ASC MITC OSVP Display Committee.
Setting Parameters
One goal was to try a variety of media on the LED wall: a still, stock-photo background; 2D video plates (photographed by Kaity); and 3D Unreal Engine environments. We also wanted to test various color temperatures of material on the wall; the wall’s native color temperature is 6,504K (D65), and we also wanted to test the content at 3,200K and 5,600K. To that end, we selected three film stocks: Kodak Vision3 50D 5203, 250D 5207 and 500T 5219. The tungsten stock was the real wild card, as it is the furthest from the wall’s native color and requires pushing the color of the content more than I’d normally prefer to — but it’s also the negative that’s closest in ISO to most of today’s digital-cinema cameras.
These are the questions we wanted to examine:
• Can a film camera work at all on an LED wall?
• Are there issues with syncing the film camera to the refresh rate of the LED panels?
• How does the narrow bandwidth of the RGB diodes relate to the color science of the film negative?
• How accurate is the color reproduction of the negative compared to the Alexa 35?
• What if we set the native color balance of the wall content (6,504K D65) and use both tungsten and daylight film without using a color-correction filter on the lens? Is the negative flexible enough to accurately reproduce these colors under these conditions?
• With no moiré possible on the film negative, can we actually focus on the wall itself?
• How well does the film camera integrate with Unreal Engine 3D environments?
Evaluating Exposure and Color
How should one evaluate the exposure and color of the wall with a film camera?
Every time you work with an LED wall, its color output must be strictly calibrated to the specific color matrix of the camera you’re using. (For example, you can’t work with a Red and a Sony on the same wall and content simultaneously without possible color issues.) With film, this requires test shooting, developing and reviewing, and then repeating the process multiple times to dial in the color calibration, which takes days. Most productions — which often barely get the proper time to calibrate their cameras and lenses — can’t afford this test time on an LED stage. Additionally, the digital camera can adjust its white balance, biasing to the native balance of the wall, but with film, you must choose either 3,200K or 5,600K.
Further, although you can use a light meter to measure brightness values coming off of LED content, it isn’t always accurate. Most meters don’t read the narrow-bandwidth color spectrum from LEDs properly. In short, you’ll still need a digital camera and a calibrated monitor throughout the production, not just in prep, to evaluate the color and exposure levels of the wall for every scene — possibly even for every shot until you train your eye in a given setting.
Arri Package
Kaity chose an Alexa 35 and Arriflex 435 for our camera comparison. We paired them with Arriflex/Zeiss Super Speed primes, and each iteration used exactly the same lens on both cameras.
For each iteration — both the technical testing and the creative testing — we started with the Alexa, set the color and exposure values, and shot the setup. We then swapped out the Alexa for the 435, moved the lens from the Alexa to the 435, and reshot the same setup as closely as possible.
Syncing Camera to Refresh Rate
In order to avoid breaking the image with line-scan aliasing, the camera — whether digital or film — must be synced to the refresh rate of the LED panels. For digital capture, this is typically accomplished through the camera’s genlock function. For the 435, the process turned out to be much simpler than I imagined. Chad Martin from Keslow Camera offered a film/video sync box — a tool commonly used for shooting television monitors with a film camera. It took a few seconds for each take to secure sync, but it worked perfectly. Other film cameras might require other hardware to achieve this.
The Color Conundrum
As part of our team, we brought in ASC associate member Tim Kang, who is the principal engineer of imaging systems for Aputure, the chair of the ASC MITC Lighting Committee, a member of the Virtual Production Committee’s StEM3-VP Subcommittee and a member of the OSVP Display Committee. He designed a rigorous methodology for putting the negative through its paces, including the comparison of real-world physical objects in the same frame with identical virtual ones: an 18-percent gray card and a X-Rite ColorChecker “Macbeth” chart. He then created a digital 16-stop dynamic-range test and a full 360-degree color ramp with multiple stops of each color.
The physical 18-percent gray card and Macbeth chart were set up on C-stands on the right side of the frame, and the digital versions were displayed on the LED wall on the left. The physical cards were lit with an Aputure Amaran 200X S with an SSI of 89 (chosen for its extremely high color fidelity). For each camera/emulsion, the physical and LED-wall charts were successively color-balanced to 6,500K (actually 6,504K, precisely matching D65 specification), 5,600K and 3,200K. Color accuracy of the physical and LED-wall charts’ light was measured with a Sekonic C-800 spectrometer.
The postproduction workflow was converting ArriRaw to LogC4 and then applying a standard Rec. 709 LUT. The film negative was scanned as 4K DPX files, converted to LogC4 and then had the same Rec. 709 LUT applied.
Looking first at the composite “Macbeth” results, you’ll see a series of squares (appearing just like a Macbeth chart), but each color chip has seven divisions — three columns across the top, one in the middle and three across the bottom. The columns on the bottom and top rows are smaller “chips” pulled directly from the footage taken at the three color temperatures. The bottom row represents how the camera/emulsion “saw” the physical chart, and the top row how it saw the wall content. The single column in the middle represents the ideal of that color patch, taken from Kang’s digital Macbeth that was used on the LED wall. If the system (digital or film) captured and represented the color on the chart perfectly, these should blend without any discernible difference with the center row, regardless of the chart’s color temperature.
Each Macbeth chart here shows the results from a respective film stock or the Alexa 35. When comparing the three rows on each color square, you can quickly see the deviation from the ideal representation to how the camera or film saw each color chip. The Alexa represents our ideal “control” here, as it should be the closest to perfect.
Creative Applications
Once Tim completed his testing, Kaity and I stepped in with our creative applications, utilizing several moments from our production’s script. Our Unreal Engine environments were built by fellow cinematographer and Unreal artist Sarah Phillips and CinePacks virtual artist Joshua Lykkeberg.
For these scenes, we chose exterior daylight, interior daylight, exterior night and interior night, along with bright, high-contrast and very low-contrast, low-key setups.
In post, we weren’t focused on perfectly matching the film to the digital; instead, we decided to correct the material artistically — first the digital and then the film — treating each as its own discrete piece. Through consistency of intent, we got extremely close, but the differences were subtle and may be difficult to discern here, on the printed page.
The first of these creative-application examples shows actors Kerry Bazarova and Jude Friedman in a virtual Unreal Engine kitchen designed by Phillips.
The second side-by-side is a bright day exterior. For a more realistic feel, we opted to deliberately overexpose the LED-wall content (also designed by Phillips with Unreal Engine). Kaity worked to incorporate a bright edge light on actors Jessica Rose and Friedman with an Arri M8 HMI PAR.
In regard to the overall differences between the two media, Kaity notes, “While film and digital are similar, and more so than I thought they would be, I found that film showed better handling of highlights and produced deeper blacks than the digital. The daylight-exterior comparison demonstrates the digital sensor blowing out the highlights more, and also shows chromatic aberration from the Super Speeds [not seen with film] on the edge of the boy’s shoulder. In the image with the mother comforting the young boy, the shadows are deeper in the film image. In my opinion, the digital appears to have a light bounce-return on the actress’ face, even though the light setup was exactly the same in both instances.”
As to film’s and digital’s respective attributes when capturing specifically in an LED-wall environment, she observes, “One of the many intriguing parts to this test was adding some analog back into a very digital world. The grain and texture from the film blends the virtual background more organically with the practical foreground, making the artificial background appear more realistic. That said, the lack of grain from the digital sensor seems to create a smoother and more elegant skin tone, with more detail in the shadows.”
Moiré
There is an aliasing that occurs between the frequencies of two fixed (isotropic) patterns that’s known as moiré. The digital sensor in a camera and the pixel pattern of the LED wall are two fixed patterns that don’t play well together, which results in moiré. (See Shot Craft, AC Jan. ’22.)
Film, however, has a unique pattern of grain in every frame (i.e., film is anisotropic), and therefore does not produce moiré. But it’s important to note that because nearly everything we see these days is on a digital display of some sort (direct view or projection), a moiré can be introduced between the confluence of the LED pixel pattern resolved on the film negative and the pixel pattern of the display (just as certain fabric patterns shot on film can ultimately produce moiré when the footage is displayed digitally). Hence, we can’t escape moiré. It can, however, be mitigated through the right selection of resampling kernel — something that will be discussed in more detail in the MITC white paper.
The Bottom Line
Film works with an LED wall and can produce wonderful results, and it can even help to blend the virtual background and the practical foreground for a more convincing in-camera composite. The robust color science of film negative, which has a near-100-year history, holds up well even under some intense scrutiny.

Acknowledgements
The following individuals and companies generously donated their time/resources to this test:
- Director/Producer – Jay Holben
- Director of Photography – Kaity Williams
- Chief Color Scientist – Tim Kang
- Color Scientist – Joseph Slomka
- Colorist – Mike Sowa ASC
- Chief Operations Officer – Alex Lopez
- Costume Designer – Emily Lewis
- Virtual Production Designer – Sarah Phillips
- Unreal Artist – Joshua Lykkeberg
XR Studios:
- President – J.T. Rooney
- Executive Producer – Francesca Benevento
- Virtual Production Supervisor – Alexander Vicente
- Studio Manager – Kevin Sanford
- Technical Producer/Project Manager – Devon Hubner
- Engineer in Charge – Ryan Patton
- Systems Technician – Jason Bowden
- Executive Assistant – Jadyn Arriola
Cast:
- Jude Friedman
- Christopher Robert Smith
- Kerry Bazarova
- Jessica Rose
- Aaron Lisitsa
Crew:
- 1st AC – Julian Splies
- 2nd ACs – Nikki Skelly, Gustavo Pérez
- Additional AC – Caitlin Brown
- DIT – Ariana Hoshino
- Gaffer – Josh Carrasco
- Best Boy Electric – Simeon Mihaylov
- Key Grip – Matthew King
- Dolly Grip – Steven Mangurten
- Grips – Justin Lipetz, Mike Kennedy, Rebecca Raines
- BTS Photographer – Derek Stettler
- 2nd AD – Frankie Westmoreland
- PA – Stephen Schneider
Motion-picture film stock provided by:
- Kodak: Vanessa Bendetti, Thais Castrale, Jacob Bottiglieri
Film processing, scanning and color services provided by:
- FotoKem: Andrew Oran, Mark Van Horne, Tom Vice
Stage provided by:
- XR Studios: J.T. Rooney, Francesca Benevento
Cameras and lenses provided by:
- Keslow Camera: Brad Wilson, Chad Martin, Mitchell Rutherford
Grip and Electric provided by:
- The MBS Group: Mike Visencio, Kimberly Villa
Dolly provided by:
- J.L. Fisher: Dan Hammond, Amy Ellis
Special thanks:
- Hailey Enge
- Curtis Clark, ASC
- Michael Goi, ASC, ISC
- Shelly Johnson, ASC