Handy Do-It-Yourself Solutions for Cinematographers Challenged by Small Budgets
The art of honing imagery to suit the needs of a story needn’t drain your bank account.
For cinematographers, the need to craft and control images is as important as ever — particularly for those working in the emerging independent and digital-video (DV) feature markets. The shoot-it-as-is, run-and-gun mentality propagated by ardent promoters of the DV “revolution” only goes so far in the aid of good storytelling.
Regardless of the size of the budget or crew, or the format in which it is shot, a film’s imagery can strengthen the written and performed script in ways that often exceed the expectations of the writer and director. Indeed, the craft of cinematography — the telling of stories with images — has been evolving since 1877, when a horse’s gallop was first captured in the famous series of stills by Eadweard Muybridge.
“To ensure consistent images all day long, a cinematographer often needs many tools to manipulate light.”

As veteran director of photography Stephen H. Burum, ASC points out, however, the art of honing imagery to suit the needs of a story needn’t drain your bank account. Foremost on Burum’s list of low-budget image-making tactics is the effective utilization of the cheapest light source available: the sun. “Painters and photographers know the best light conditions are the two or three hours after sunrise and before sunset. They want to avoid shooting during the middle of the day. To ensure consistent images all day long, a cinematographer often needs many tools to manipulate light.
“One of the most effective tools we use every day in cinematography is very cost-effective: reflectors. All sorts of reflectors have been used in the motion-picture business from the very beginning. In fact, even Renaissance painters used reflectors to help them light their subjects in a more pleasing manner.” (See “A History of Ingenuity” below.)

Augmenting available daylight with reflectors requires planning and staging according to the arc of the sun throughout the day. Burum offers, “When the studios used to have their large backlots, they oriented their streets so that they were built running north and south. As far back as the silent-film days, they’d always try to shoot toward the south, because that way they’d always have a consistent backlight and would be able to use reflectors to fill and model the actors’ faces. Reflectors were positioned on the actors in exactly the same way you’d use lamps on a stage.
“You never want to plan your shoot for a whole day at a location that runs east or west, because you’ll only have half a day of consistent light. If you have a street running north and south, in the morning the west side of the street is lit and the east side is in shadow. If you choose to shoot in shadow, you’d start out in the morning shooting east. When the sun starts to flip over, you’d begin to turn around, shooting south into backlight; then, as the sun begins to set in the west, you’d shoot toward the west.
“In this manner, you can maintain a consistent look and map out your shots according to the direction in which you’re shooting,” Burum continues. “Also, you can plan to do all of your big wide shots early in the morning or later in the afternoon, while the sun angle is best. Then, while the sun is directly overhead and harsh, you can cover your actors with a silk and light them to best advantage, with reflectors doing all of your close-ups and medium shots. That’s one way you can effectively use the middle of the day [when the light is not ideal] and still shoot under the burden of a schedule.”
Burum stresses that reflected daylight is often overlooked as a technique for illuminating day-interior scenes. “You don’t always need lights in your location interiors,” he suggests. “You can use daylight coming through the windows and augment that light with a few reflectors — such as mirrors if you want to get a sharp shaft of light and hard shadows, or a softer reflector like a silver, shiny board — angled outside to perhaps come in through a window off-camera. You can further refine the reflected light by putting up a bit of diffusion to soften it even more.
“On two of the films I shot, Casualties of War and The Untouchables, we built houses on location that were constructed so that the roofs could be removed, and I could then cover the top with muslin and use some neutral density or scrim on the windows. To balance between the light outside and the toplight from the muslin, it didn’t matter whether the sun was in or out; as the light changed, the balance between the two stayed the same. With this method, all you have to do is change your f-stop. It works very efficiently.”
Maximizing the sun’s luminance by using reflectors as a source of light is an idea that goes back through the history of art. “Everybody wants to make pictures inexpensively and efficiently, but it’s not equipment that makes good photography, it’s a person’s mind,” says Burum. “If you understand what the principles are, you can use what’s around you. The question I always try to address in articles for AC is: ‘What is the underlying principle?’ Once you understand what that is, it’s up to your imagination to figure out how you can modify something that’s available to you. Where do you think all the gear we use today came from in the first place? In the beginning, there were no companies like Matthews or Mole-Richardson!
“Now you can buy and/or rent all of these wonderful frames, reflectors and stands from the equipment-rental houses, but you may not be able to afford them,” he continues. “There are many substitute items you can find very inexpensively in a standard hardware store.
“One of the best materials to make frames with is electrical conduit (EMT). The pipes come in ½-inch and ¾-inch sizes in lengths up to 10 feet, and you can get 90-degree elbows or straight couplings so that you can fashion them into frames. You can also use plastic PVC plumbing tubes. They have 90-degree PVC corners as well, but PVC is a little flexible. There are two ways to stiffen it up a bit. First, you can fill the tubes with spray foam, which makes the PVC very stiff. Just make sure you do it somewhere flat, because if the PVC is bent while it dries, the tube will stay bent. The other way is to put a wood dowel in it, just like they used to do when they made old aircraft; the crews drove a wooden dowel into the aluminum tubing, and this made the tubing very strong while still keeping it very lightweight.”


Burum has discovered that many of the materials used in filming can also be found at local hardware and fabric stores. “A lot of people like to use Griffolyn in frames as a bounce reflector. Griffolyn was originally developed for farmers in the Midwest to cover their haystacks, and then somebody thought it might work for movies. Another popular material to use in frames is gridcloth, which is essentially rip-stop nylon. You can go to any fabric store and ask for white rip-stop nylon; you’ll have the same thing as gridcloth, only it will cost you half as much. Other useful fabrics include percale bed sheets, sail cloth, silk and taffeta.
“There are all sorts of ways to attach the material to frames,” he continues. “You can put grommets around the edges, or use the little garter-snap-type fasteners that you can find at camping stores. To make a fold-up reflector, use a space blanket [plastic material with one aluminized, reflective side], which you can get for $20 at any camping store. For less than $30, you can make a great reflector.”
Another material many cinematographers use for exterior light modification is scrim, also known as bobbinet. “Scrim is very expensive, but your local home-builders store has a substitute that works terrifically: fiberglass windowscreen. It comes in very large widths because it often has to cover large sliding doors and such. Again, you can use grommets or those garter-snap tie-offs from the camping store to tie the material to your frames.”
For not-so-handy cinematographers, or those who are in a rush, Burum recommends whole pre-fabricated windowscreens. “Those are nice because the frame is already built with plastic corners, and the plastic screen is held down with an O-ring that goes into a slot, so you can even change the material in the frame, perhaps putting in some of your cheap rip-stop nylon,” he advises. “The biggest windowscreen frames I’ve seen are about 8-by-8 feet and go for about $30. Even though they’re not the strongest frames in the world, you can still have an 8-by-8 scrim in a frame for $30!”


“There are many other hard-surface materials at the hardware store that are useful,” he concludes. “One old standby is plywood painted white or silver, or with various foils stuck on it. Solid foam insulation — beadboard — sometimes comes with a silver as well as a soft white side.
“These reflectors can be set down on the ground and held at the proper angle by a single or double pole, depending on the size. If you wish to elevate your frame, you must use a pair of century stands. To hold the frame in the C-stand heads, you must make an adapter to first hold the frame, then clamp it to the C-stand head. Your local hardware store has pipe-repair clamps in various sizes that will hold PVC or EMT tubing. Then fit a flat piece of 1/8" aluminum, steel or 1/4" plywood with a 3/4" slot 2 inches long. This will do the trick.


“The century stand is the only must-have piece of equipment. Used C-stands can be purchased on the Web. There are two sizes of century heads, 2 1/2" and 4 1/2"; the larger size fits bigger stands to support frames up to 20 feet square. The smaller heads and stands can only safely be used for frames up to 8 feet square.
Other Build-It-Yourself Tips
Standard sizes for flags and open-end scrims are 12" x 18", 18" x 24" and 24" x 36". To create your own flag, take an 1/8" piece of lauan plywood and cut the wood to the appropriate size. Then paint it flat black and cut a 3/4"-wide slot that is 1 3/4" to 2" long. This makes a flag to completely block the light.

Open-end scrims to cut light intensity can be made by cutting a U-shaped frame out of 1/4" plywood. Fiberglass or wire windowscreen can then be stapled in double or single layers to complete the job. This works for colored gel, too.

Holders for scrims and flags use the slotted 1/8" aluminum, steel or 1/4" plywood C-stand adapter bolted to the scrim frame. Or, weld 3/8" steel rod to a flat piece of 1/8" x 1" steel and drill two or three ¼" holes. The round rod is the correct size to fit the C-stand head. 1/4" bolts will hold the adapter to flag, scrim frame or pattern cutouts. (See illustration of pipe repair clamp above.)

Many sizes of fittings for schedule 40 tubing and pipe come in standard sizes: 1/2, 3/4, 1, 1 1/4, 1 1/2 and 2". Plastic PVC, steel and aluminum all come in these sizes. You can use fittings made of all these materials interchangeably. Electrical tubing (EMT) is a different size and must be used with its own fittings. The pipe-repair clamps fit schedule 40 pipe.
Breakdown Pillowcase Flag/Reflector: A flag frame may be made of 1/2" PVC tubing and four 90° corners. The side that is used to hold the flag in the c-stand will have a wooden dowl in the center. A 5 inch 3/8” carriage bolt will be used as a grab point for the c-stand. To cover this frame, use a pillowcase (standard size 20”x 30” or King 20”x 40”). Use black for cutting the light or white as a small reflector.


Reflector Holder: By using large chip bag clips you can fashion a bracket for holding a beadboard reflector, piece of show card or an auto windshield shade (often made of mylar reflector material). Drilling a series of holes can accommodate various sizes. A ¾” PVC tube is the base to which two chip bag clips are bolted. Use ¼”/20 bolts washers and wing nuts. The pipe repair clamp and c-stand adapter plate are used to hold this rig in the c-stand.


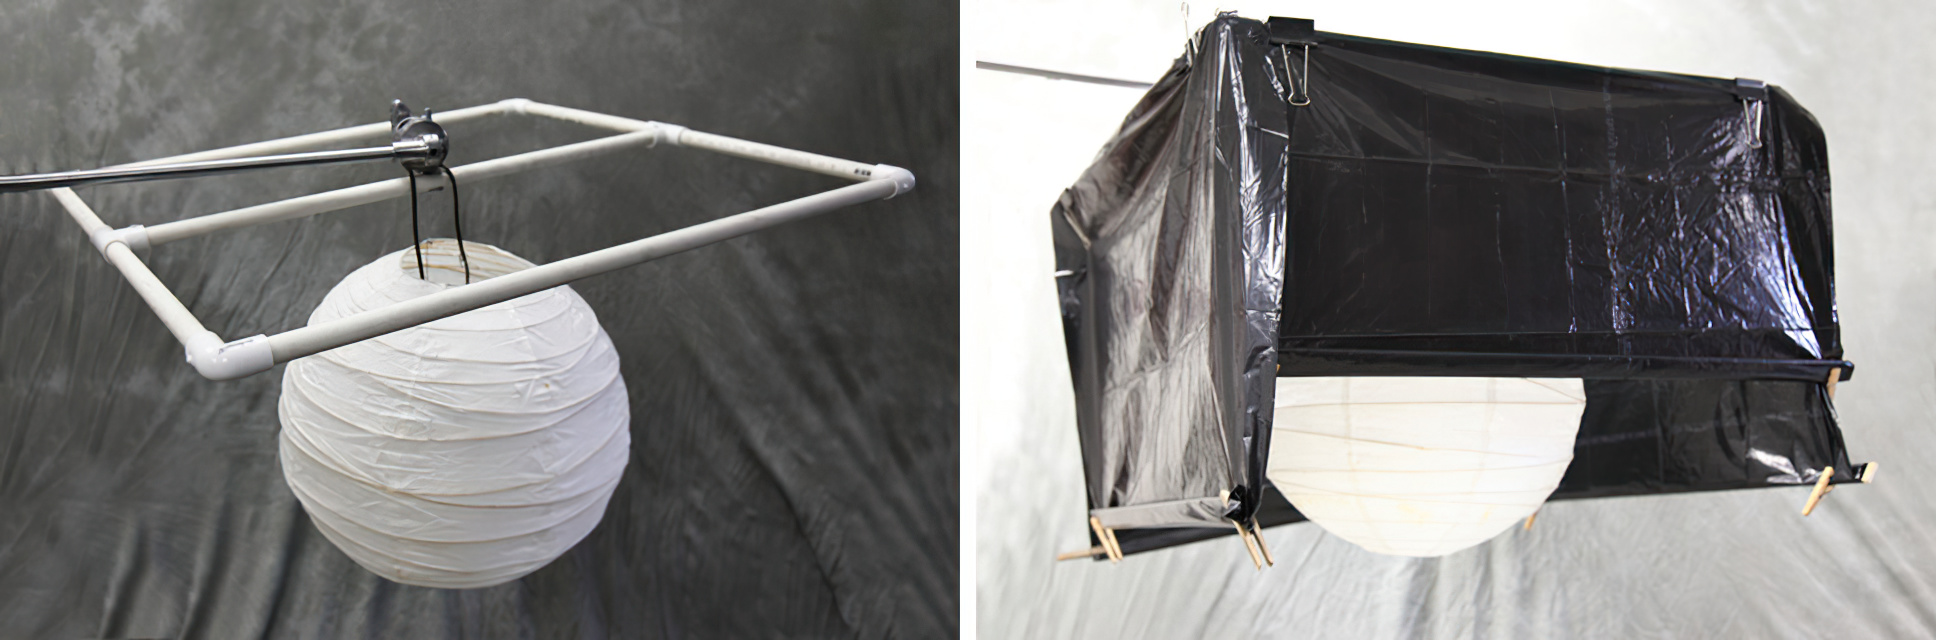
Controlling light from “China Balls,” (a round paper lantern with a globe inside), is often difficult. Adding a skirt around the china ball can solve this problem. Make a frame from 1/2" or 3/4" PVC tubing that is about 6” bigger than the size of the china ball. A 24” ball will require at least a 30” frame. Use PVC 90° corners and “Tee” parts to hold the frame together. A 3/8” carriage bolt 5” long can be used as a grab point for a century stand head.

The skirting material may be opaque cloth or plastic sheeting. A thin piece of wood running the length of the bottom of the fabric will allow you to roll it up and down to the desired height. Wooden clothespins will hold it in place. The skirts can be tied, taped or clamped on the PVC frame.

A History of Ingenuity
Part of the heritage of cinema is the tireless inventiveness of its practitioners. With few iron-clad rules dictating equipment and techniques, the film industry has evolved as a logistics and problem-solving pressure cooker, with roots reaching back to the Renaissance painters. “When doing still-life portraits, painters would often go outside and stretch muslin over their subjects to get soft light,” says Burum. “When photography first started in the 1830s and 1840s, they had studios with big, glass ceilings and walls that faced north, allowing them the same kind of consistent light; they would seat people there and take very long exposures. If they wanted to manipulate light, they used large, black panels, or white muslin that they could pull over the top or the sides to create different lighting effects. When the movie industry started up in the early 1900s, filmmakers basically borrowed from the same traditions.”
Burum points out that early filmmakers used either glass studios or studio sets that could turn on big Lazy Susans, enabling them to point the studios towards the sun. “The most famous of these was the one Thomas Edison built in New Jersey called The Black Maria. Also, filmmakers often built their sets on platforms so that they were shooting south, placing everything in backlight so that they could then put out reflectors to bring light back into the set to get an exposure.”
On these “stages,” early film practitioners experimented with an array of reflecting materials available at that time. “They’d get a piece of 4-by-8-foot plywood, paint it white, and lean it against a post to reflect light back at their scene,” Burum details. “They also used mirrors if they wanted a harder light or needed more exposure. They soon found that big mirrors were too heavy to move around and tended to break easily, so they began using the ferrotype tin, which is basically a large piece of chromed metal.
“Ferrotype tins were originally made as a photo finishing tool to get glossy prints, they were made in different sizes, so filmmakers would have them framed up to use as reflectors,” he continues. “However, sometimes the light they created was too hard, so they’d take a ball-peen hammer and bang them so that the light would be softer; they called those ‘dipples.’ The only problem with propping any of those reflectors on the ground was that the light was coming from down low, and in most situations that looks unnatural and is hard on the actor’s eyes. It was therefore decided that reflectors should be elevated, so crews built parallels and set the reflectors up higher, angling them to catch the sun.”
As cinema continued to advance and film sensitivities charged toward double-digit ASAs, the need for softer, subtler bounce and reflecting sources became apparent. “The early filmmakers then decided to take a big piece of muslin and other fabrics in frames and use those to reflect light,” says Burum. “Those frames were usually quite large, so they’d lean the frames against two poles. Sign painters leaf was applied to 4’ x 4’ pieces of plywood for a soft yet punchy effect; both silver and gold were much in favor. They eventually came up with a sort of paint-easel configuration to support the smaller mirror and tin reflectors. Finally, the collapsible stands-and-yokes system we use today became standard.
“This is also why filmmakers came to California — there was plenty of sunshine most of the time!”

The Professional Use of Reflectors
The function of the sunlight reflector may be likened to that of the flashbulb in the still-photographer’s camera: to throw needed light into shadow areas of a scene to balance the illumination for best pictorial results.
Reflectors are essential equipment for any producer of motion-picture films. Even when booster lights are brought along to a distant exterior location, invariably reflectors will be found in use also, for quite often they can provide light of a different quality or can throw light from an angle not possible with a booster light because of the terrain or power problems. The small-film producer, of course, will find reflectors indispensable, for reflectors can be made to serve his purpose in most exterior locations, making it unnecessary for his crew to employ the more costly booster lights and power generator.
When reflectors first were used in cinematography, they were usually placed on the ground and tilted, with a stick supporting them at the desired angle. But the light thus reflected from a low angle was unnatural, and gradually reflectors were elevated — mounted on parallels to produce reflected light from a more natural angle. Outdoors, sunlight comes from above, and it is only logical that reflected light, to appear natural and unobtrusive, come from an elevated angle also. Ultimately, the studios started mounting their reflectors on tripods or metal stands, with the reflector tilting within a metal, U-shaped yoke mounted atop the adjustable stand.
Until recently, users of reflectors built their own. Now, professional-type dual-surfaced reflectors, complete with yoke and pedestal, are available. The reflector is constructed of plywood ¼-inch thick supported within a wooden frame. Overall size is 4'. The frame has fittings for mounting the reflector on a pedestal or for attaching a telescoping support at the back, where the reflector is to be used on the ground. The yoke and pedestal are constructed of steel tubing. The latter is adjustable from a low of 60" to a maximum height of 96".
The simplest and most obvious use of the reflector is to lighten up the shadow side of faces when shooting in crosslight outdoors. For this, a fairly soft reflector — the aluminum papered surface — is usually best. The reflector should be placed well back from the subject so that the effect of shadow remains, but with the shadow area lightened sufficiently to permit the camera to capture necessary detail. Here, the reflector should be elevated so that the light strikes the subject at face level or from slightly above. In any case, the reflected light should not be so intense as to cause the subject to squint.
Reflectors find important use also when the cinematographer works in backlight. Here, two reflectors should be used — one at either side of the subject throwing fill light towards both sides of the face — and a third placed somewhat closer to the subject (with consequent “hotter” light) to provide a measure of modeling in the illumination.
The skillful cameraman will achieve results with reflectors that are subtle, and do not make use of reflectors obvious in the scene. Like every other cinematic treatment, when reflected lighting is overdone, it is distracting as well as completely unnatural.
By using reflectors, action can be staged in shade, as for example on a porch, under large shade trees, or in the shadow of a house or tall building. Here, reflectors can be set up beyond the shaded area in such a manner as to throw reflected sunlight into the scene. Of course, this calls for shooting on the location at the time of day when the sun is in the right position to make reflector use effective. Where action is staged in deep shade, hard-surfaced reflectors are the best to use, as their light beams hold together and carry for a greater distance than do those of soft reflectors. Professional cinematographers have been known to use reflectors in relays for this type of shot — bouncing light from one reflector to another until the light reaches the desired spot. This is useful, of course, where access to sunlight is not direct, as in the average type of shot calling for reflector use.
Another professional use for sunlight reflectors is to provide backlighting and rimlighting. A typical example of using reflectors for backlighting is where the subject is out in the open, facing the sun. Camera angle permitting, a hard reflector is placed in back of the subject to throw reflected light upon him to provide added separation. Sometimes two reflectors are better for this — one at each side, toward the back.
Use of reflectors in cinematography rarely poses an exposure problem. Once the contrast effect has been checked with the aid of a contrast viewing glass, the usual meter reading — either reflected or incident light — is read and the lens set accordingly. It sometimes happens that balancing the reflector-filled shadow side of a face with the bright side becomes a problem. To get an effect of natural “open” shadow, there should be about half as much light in the shadow as in the highlight. Increase or decrease the illumination of the reflector-lighted area by moving the reflectors toward or away from subject or scene until the right balance is obtained.
Longtime AC contributor and cinematographer Christopher Probst was later invited to join the ASC as an active member.
Stephen H. Burum was honored by the ASC with its Lifetime Achievement Award in 2008.