Lighting a Set with Stephen H. Burum, ASC
The cinematographer details a time-honored technique of working with Fresnel fixtures to model actors, separate them from the background and fill shadows.
Images courtesy of Benjamin B and the ASC Archives.

As part of AC’s yearlong salute to the American Society of Cinematographers’ centennial year, we’re turning to the archive to revisit a master lesson in lighting fundamentals. While aesthetic sensibilities — and, indeed, the very tools of lighting — continue to evolve, there remain timeless concepts that serve as a foundation upon which cinematographers can build with whatever personal touches are appropriate for the story at hand. Here, we hark back to “classical” techniques of lighting a set with multiple Fresnel fixtures and varying amounts of fill, as demonstrated by Stephen H. Burum, ASC.
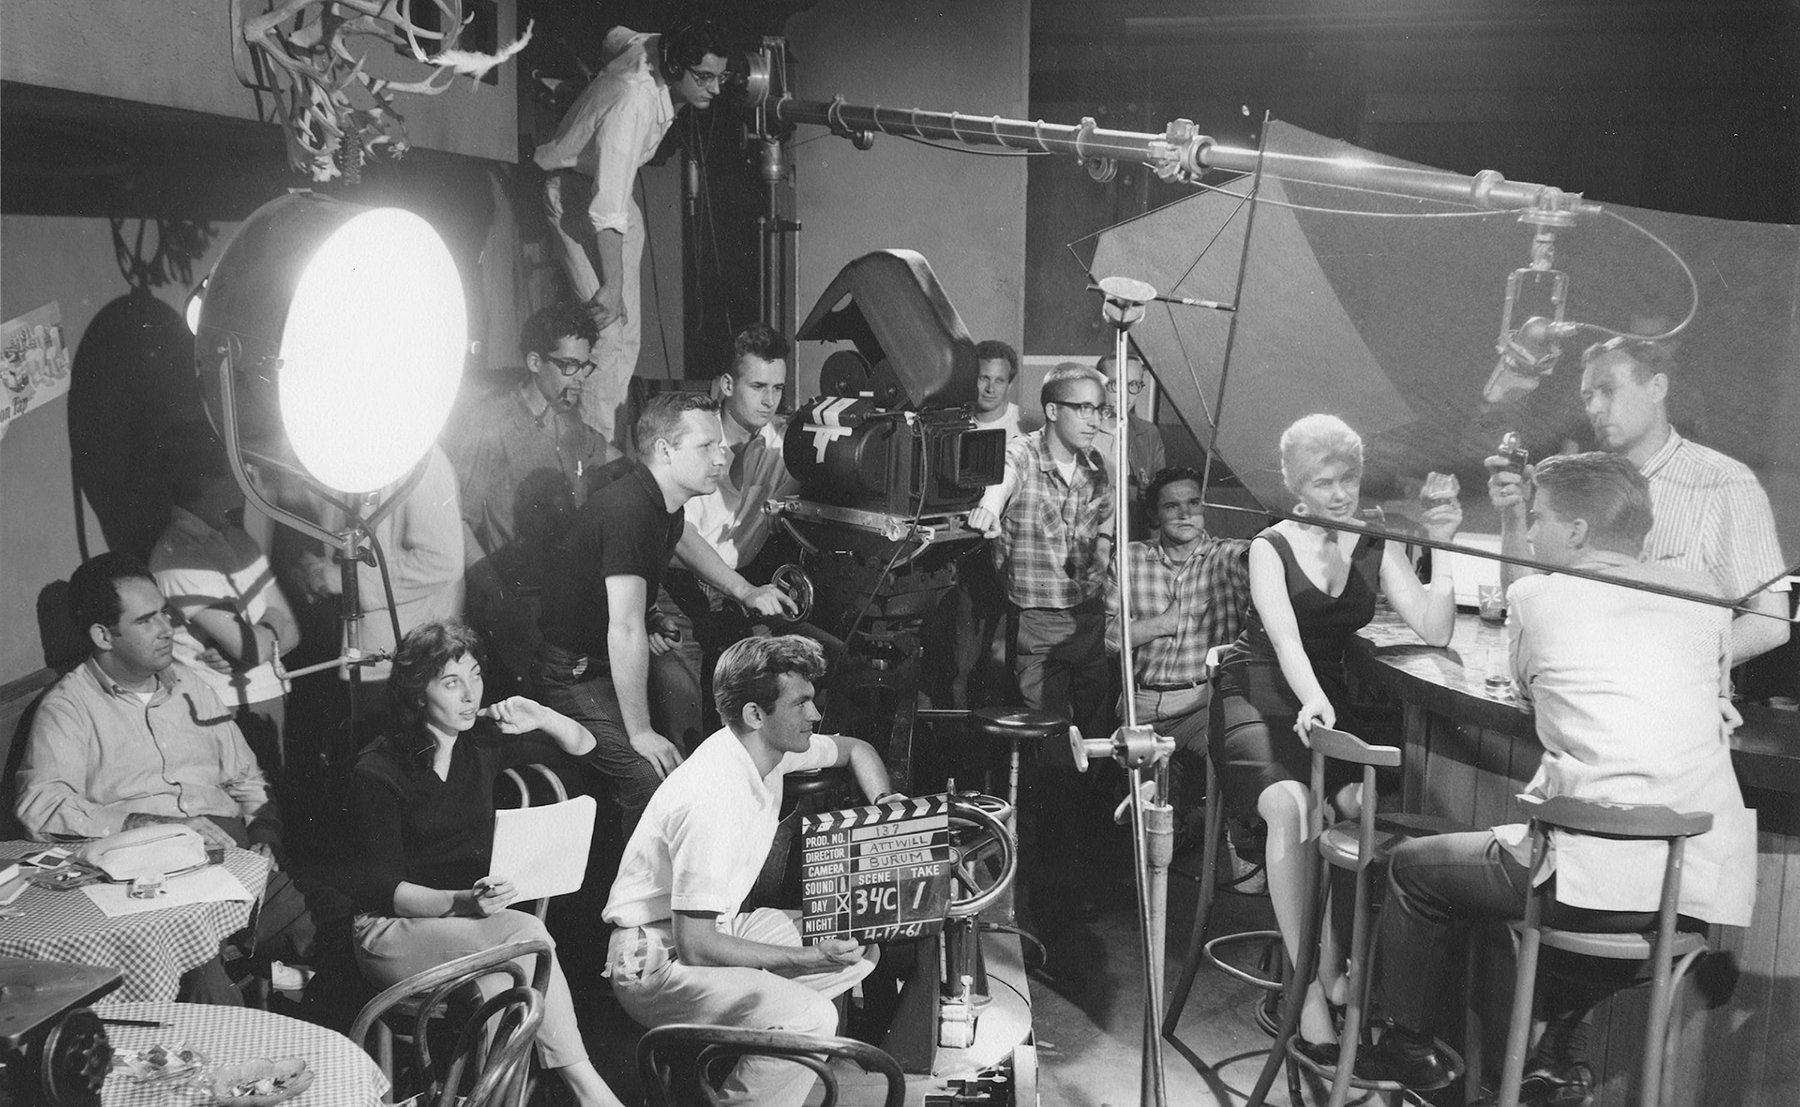
The article is adapted from the 2002 book Reflections: 21 Cinematographers at Work — written by Benjamin Bergery and published by the ASC Press — and is based on a 35mm workshop that Bergery organized at the University of California, Los Angeles, with the support of Panavision and Kodak.
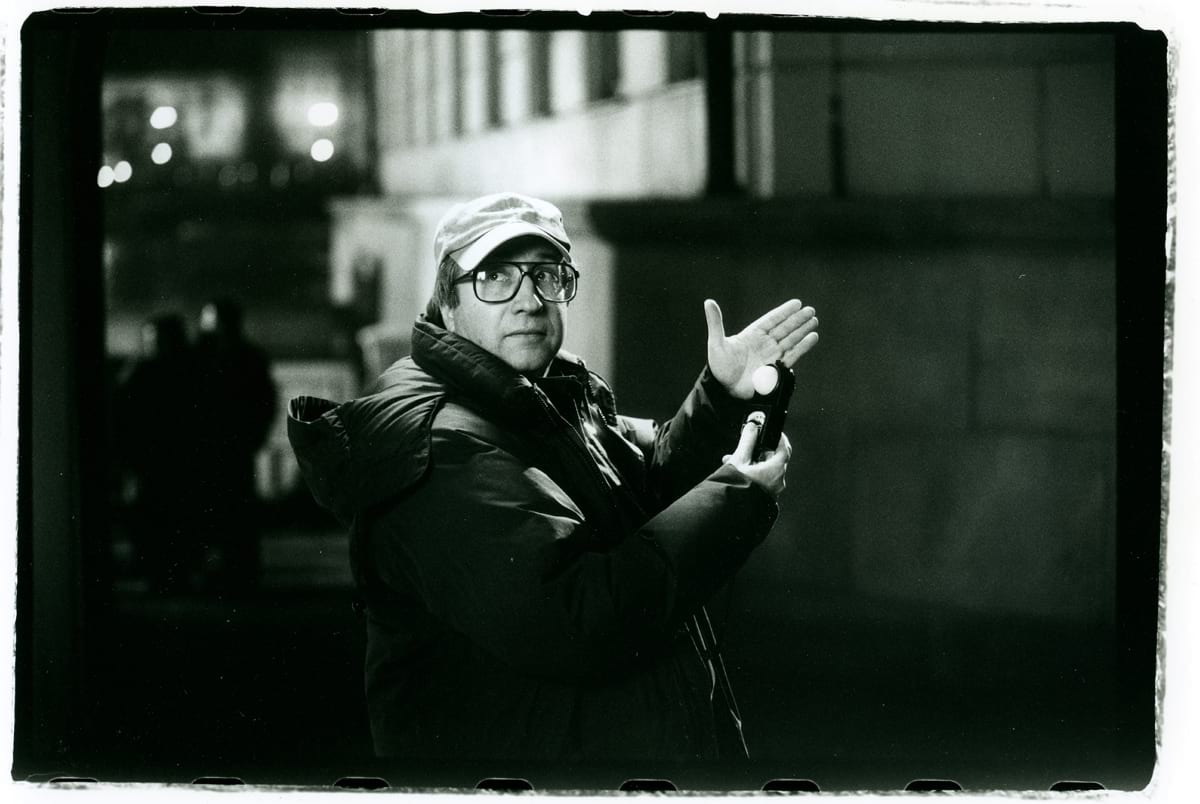
Stephen H. Burum, ASC is known for his striking collaboration on eight films with director Brian De Palma, including Body Double, Casualties of War, Carlito’s Way and Mission: Impossible (AC June ’96). His credits also include the memorable second-unit cinematography for Apocalypse Now, and the sophisticated imagery of Rumble Fish and The Shadow. Burum has received ASC Award nominations for both The Untouchables and The War of the Roses — and an Oscar nomination for Hoffa, which earned him an ASC Award as well. He received the ASC’s Lifetime Achievement Award in 2008 (AC Jan. ’08).
In the workshop, Burum was intent on providing the students with a method for lighting an interior. “Interiors are always the hardest for people to start,” he explains, “because you go into a big black room and you have to create everything.”
The cinematographer firmly believes that film lighting has three universal functions: “Everyone does at least one of three things every time they light a set:
1. The first thing is to cast a shadow. The light that casts the shadow could be a tiny pinpoint source, a big soft source, or anything in between. The shadow can be a hard shadow with a hard edge, or a soft shadow with an edge that just trails off into nothing. You can also opt for no shadow at all. It’s the difference between when the sun’s out and a cloudy day, or any gradation in between.
2. The second thing you do in lighting is to create separation. Photography looks at the world with only one lens, and you need to introduce a three-dimensional quality to this two-dimensional image. There’s only one way to accomplish that: creating areas of light against dark or dark against light. I’m not referring to color. For example, you may put a backlight on someone’s dark head so that you have a dark area, a little bright halo, and another dark area. Or you may put a light on a wall behind somebody’s dark shoulder. You can put in as many of those planes as you want.
3. The third and final thing that you do in lighting is to add fill, which gives the image a mood by defining how deeply you can see into the shadow areas.”
Burum is categorical about the universality of casting a shadow, separating and filling. “These are the things that all cinematographers do. It’s like the three primary colors. All painters use the three primary colors, but they mix them in different ways. Similarly, all cinematographers use light to accomplish the three basic functions I’ve mentioned. The artistry lies in how you use them.”
During the workshop, the cinematographer enacted the usual sequence of events that occurs during a soundstage shoot: lighting the set, rehearsing with the actors, lighting the scene with the stand-ins, and finalizing the light during the actual shooting.
“I usually light the set first, because I don’t have the actors or the director yet. I start by setting the time of day or night, and then define the space using separation and modeling. After that, I can rough in the key lights for the areas where the actors are going to be.
“Following the rehearsal, I finesse the lighting with the stand-ins and add the fill light. After the first take, I may decide that I have too much fill; I often back off a bit once I have seen the actors and their flesh tones, the real value of their costumes, and how it all plays.”
For the workshop footage, Burum chose to evoke a late-afternoon sunlit interior. Intending for the footage to be a lighting demonstration — and not a polished, finished piece — he shot a simple scene in an unpainted set on the school’s stage, and even left a C-stand in the frame. All the fixtures were Fresnel spots, except for one Mole-Richardson 1K Zip soft light.
In the 35mm frames from the workshop print, a man stands next to a woman lying on a settee in a wide set. The back walls are modeled by three distinct planes of venetian-blind shadows. The settee foreground area is delineated by a 2K through a window. A 10K — with its Fresnel lens swung out of the way, in an “open eye” or “open face” configuration — stripes a background wall through a set of blinds, and also patterns the left-most wall through a shuttered window. The resulting effect is a striking mesh of horizontals that suggest the low angle of late-afternoon sunlight.
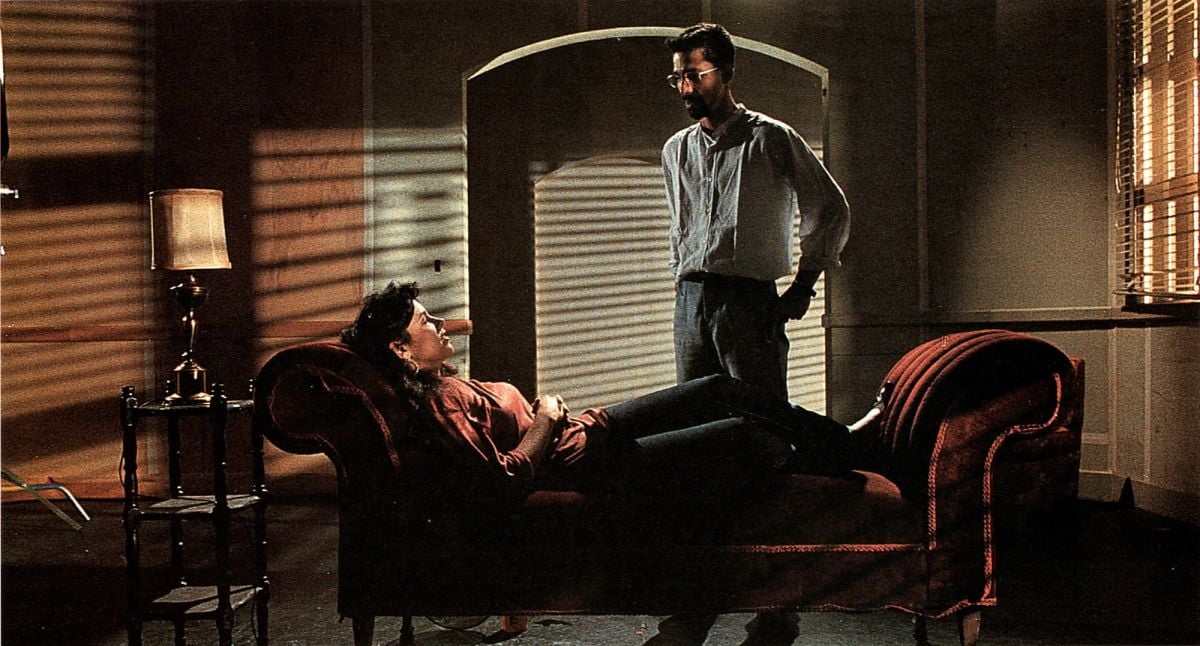
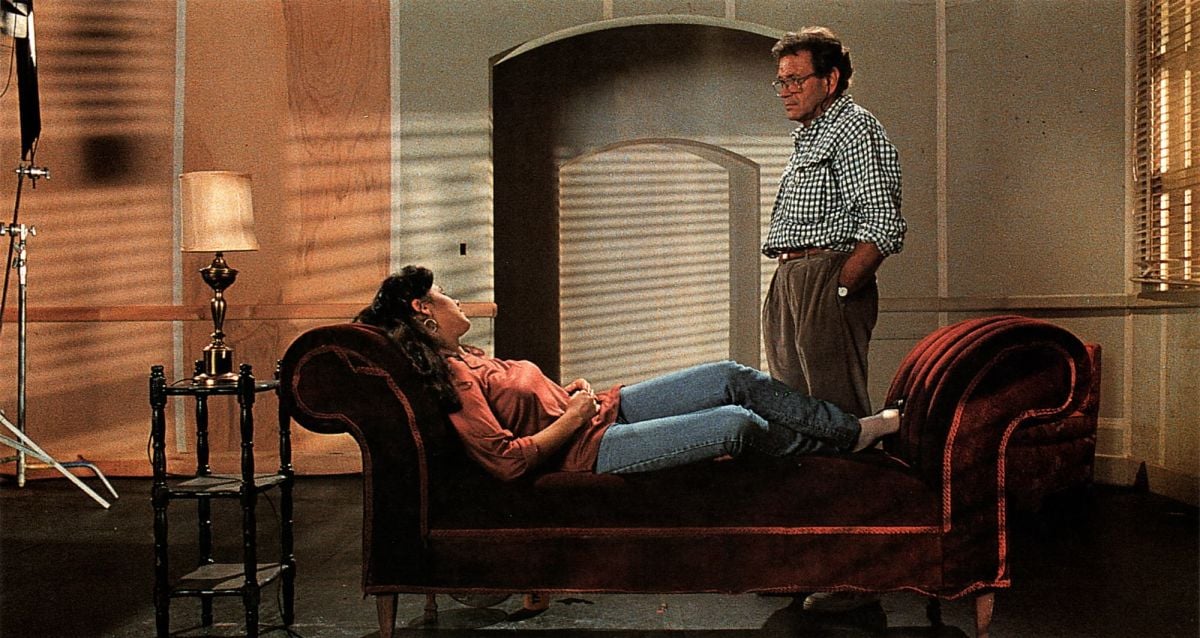
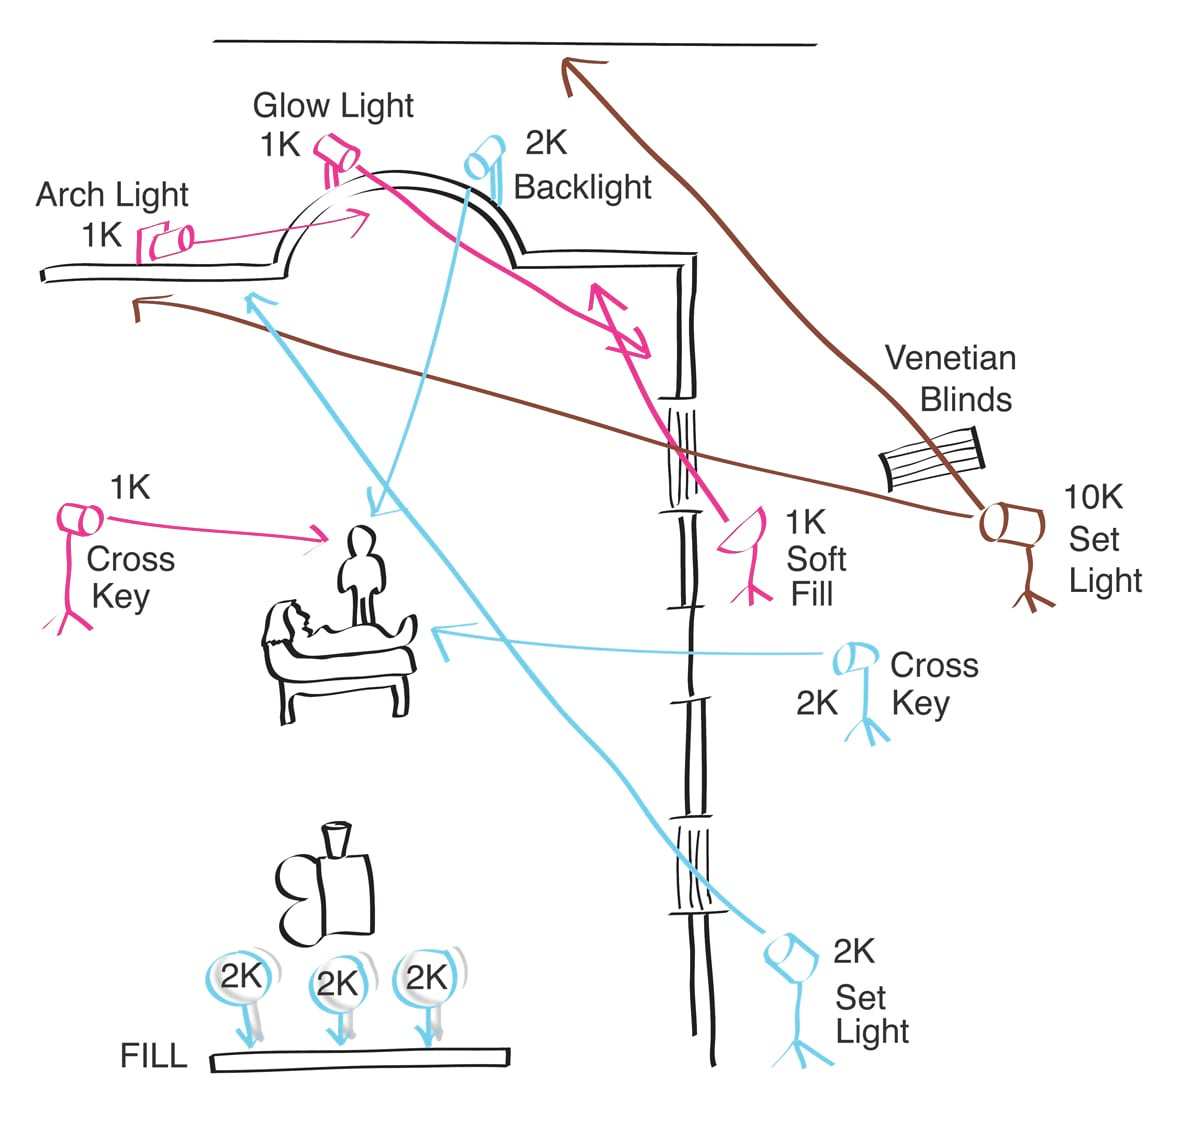
Two light sources illuminate the dark, right-hand corner of the set. A 1K from a catwalk above the stage simulates the “glow” from daylight bounce, while a 1K Zip soft light through a window fills in the shadows. A low 1K separates the archway by providing a bright overhead rim. The cinematographer explains that background lights such as these serve to model a three-dimensional space, and to separate planes of light and dark.
Burum offers this operational definition of a key light: “The key is a light that you use to set your exposure. There can be 4,000 keys in a frame — you can have a key on one person, on two people, on the door they walk through, or on a telephone in the set.” Burum always measures the key by pointing his incident meter toward the light rather than toward the camera, to avoid any measurement ambiguity.
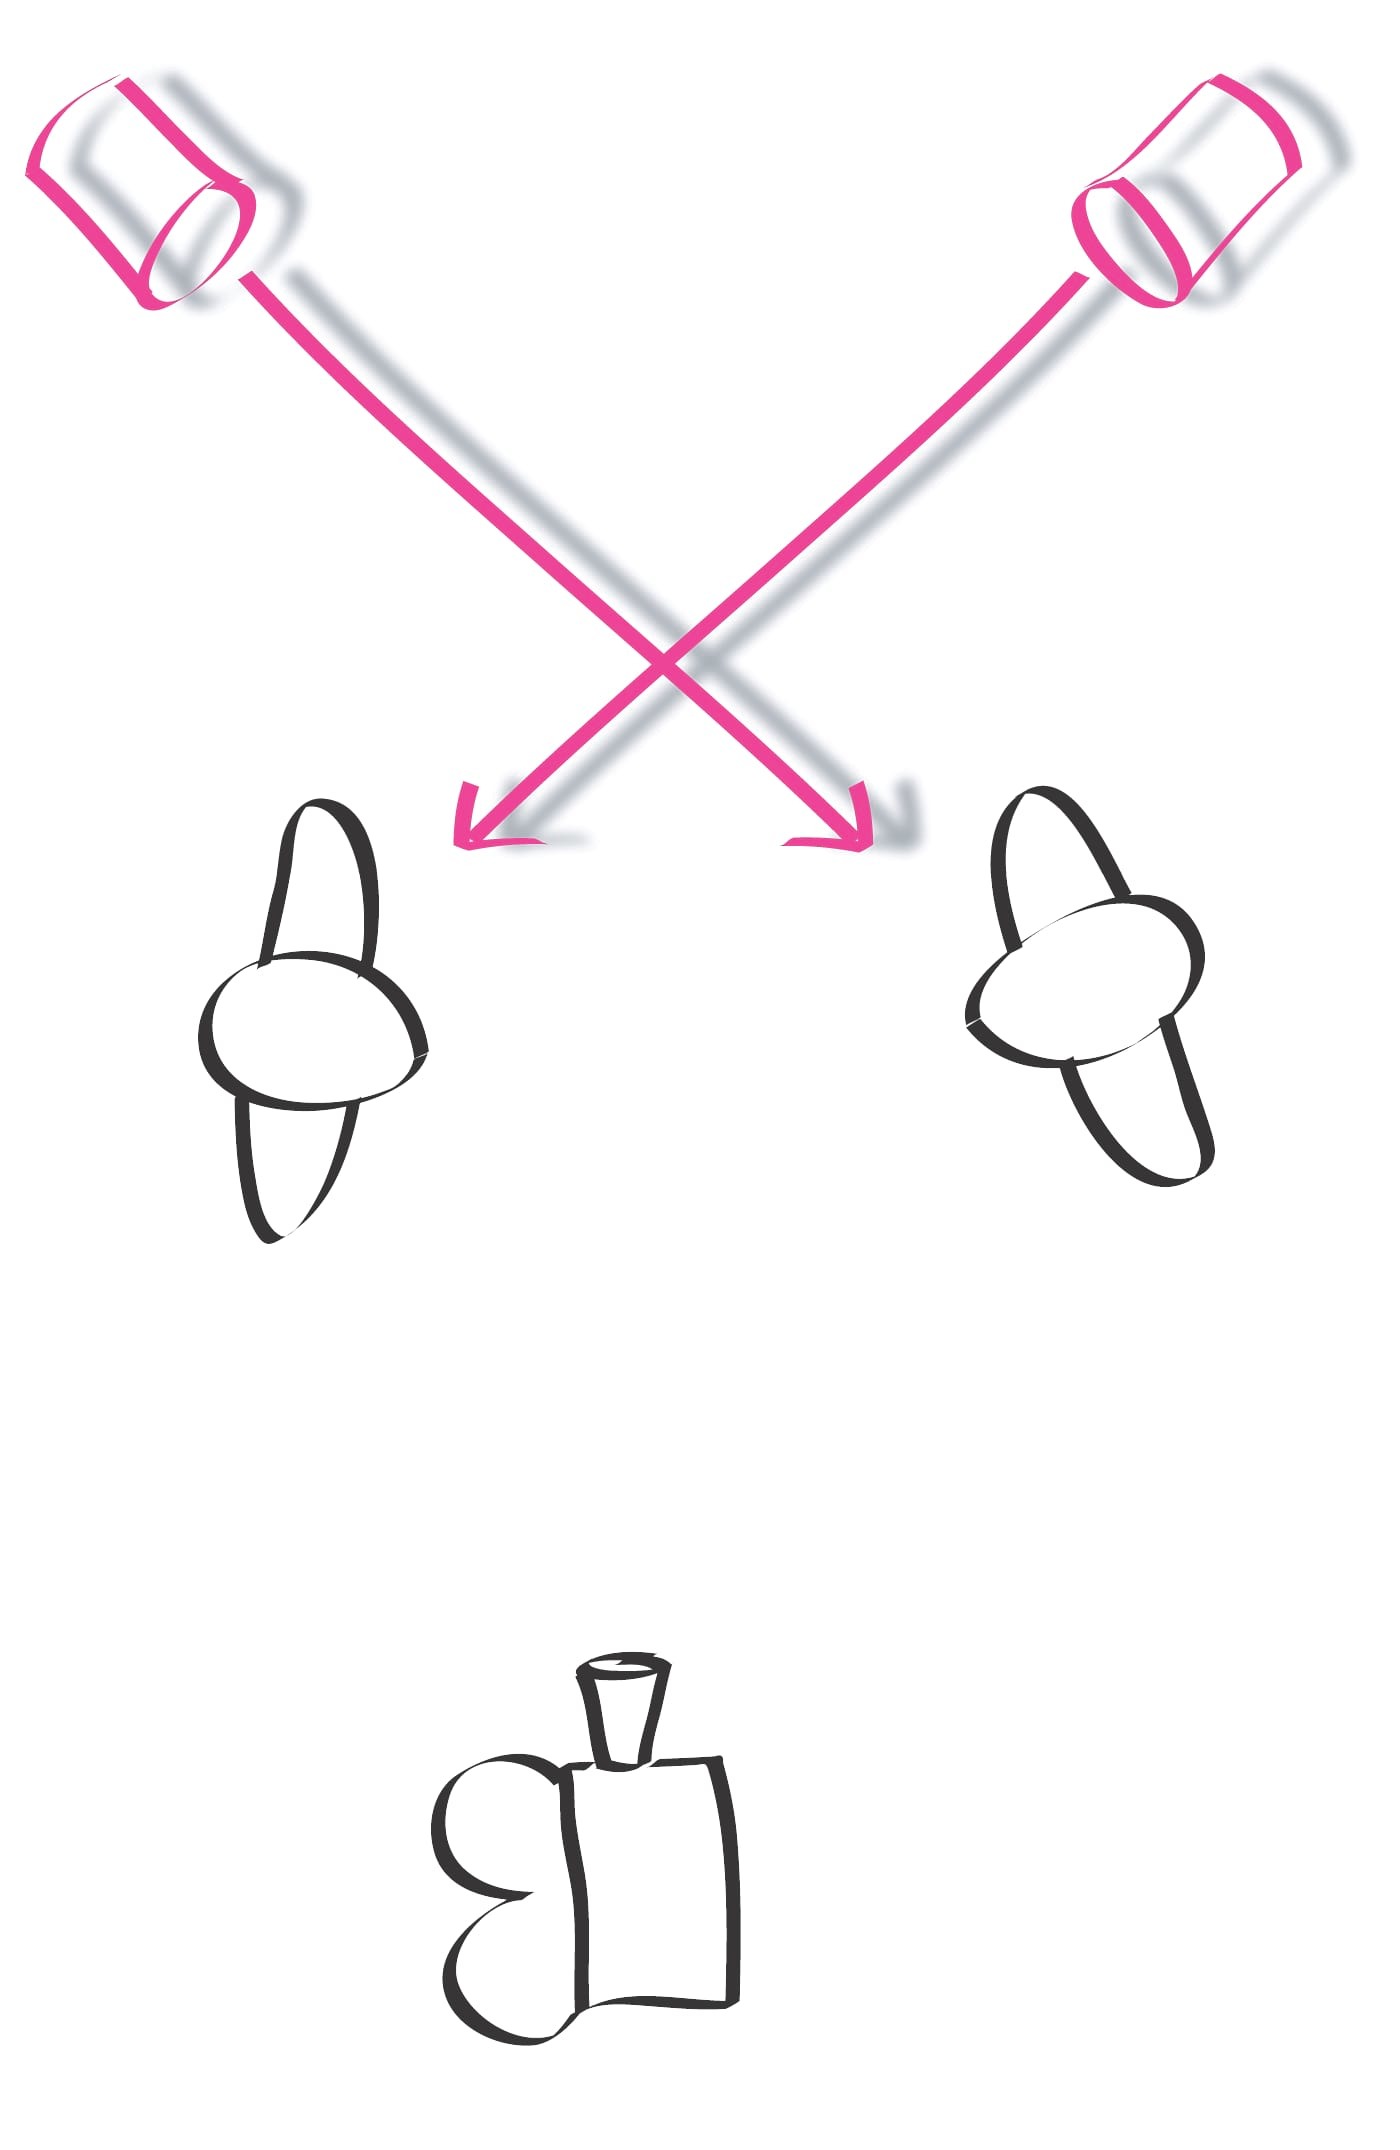
In the workshop setup there are two keys, one for each actor. Each light provides 40 footcandles, yielding an exposure of T4 at ISO 500. The woman’s key is a right-hand 2K through a window without blinds. The man’s key is a left-hand 1K. Burum refers to these placements as “inside cross-keys,” because the angle of the key lights to the camera-subject axis is greater than 90 degrees, creating a rim of light on the profiles. Both actors are also separated from the dark background by a 2K backlight.
“The key light’s job is to cast a shadow and give the scene texture, roundness and three-dimensionality. It also gives you illumination and an exposure level. Then you’ve got the lights that separate things: the backlights, the glow lights, the kickers, the set lights, and all of the other fixtures that provide gradations of light against dark.”
Burum adds that the rear key position directs the eye of the audience. “It’s a compositional scheme. Inside cross-keys pull the attention to the center of the frame, because you have dark on the outside and light on the inside; there’s usually another bright area behind the faces, so everything is contained in the middle of the frame.”
The cinematographer notes that the position of the actor is also crucial, especially for lighting close-ups. In the workshop scheme, “the actress is facing her key light,” he says. “If you want to make your actors look good, have them face their key light. There has been a fashion in photography to have people face off-key, and to add a soft light that wraps around. If you’re dealing with an older actor, or a movie star that people come to see, you have to make them look as good as you can. Unless they’re extraordinarily good-looking or unusual-looking, people will look better if they’re looking toward their key, because the light delineates facial structure. It also gets rid of the little wrinkles around the eyes, and the nicks and bumps on the face.”
For Burum, the same exposure considerations apply for both day and night setups. “The concept of underexposing for night and overexposing for day is erroneous. The difference between a day and a night interior is not the exposure, but the difference between the volumes of blacks and highlights in the frame. If you’re exposing for T4, your key is 200 footcandles whether it’s daytime or nighttime, but during the day you have more highlights. If you’re doing a night scene, you’re going to cast a big shadow, and you’re not going to see very far into the shadow. The difference between day and night is in the way you define light and dark areas. In a night scene, you tend to have a lot more darkness in the frame, and in a daytime scene, you have more brightness. That’s all there is to it.”
The cinematographer adds that he prefers to include a “value at key” in his images, a so-called “middle gray” exposure that serves as a reference for the brighter and darker values. “An actor’s face can be one or two stops under, but you should have a middle reference somewhere in the frame, because it makes the frame look complete. It’s how people perceive things.”
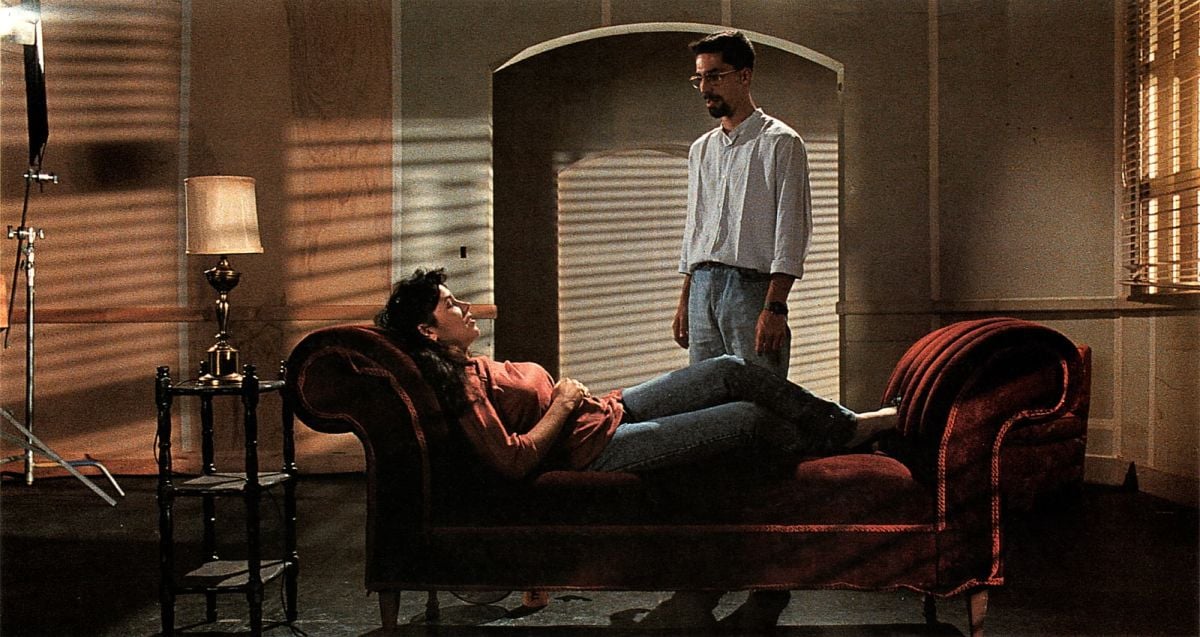
Burum’s last step in the workshop is to add fill light, provided in this case by three 2Ks bounced off of an ordinary white bedsheet suspended directly behind the camera. Burum explains that fill is sometimes needed to convey human perception within the limited contrast range of film, by allowing the film emulsion to reproduce details in the shadows that would otherwise escape it.
"Photographers invented fill light to bring shadow levels that don’t reproduce on film up to a level that would match what we can see with our eyes.”
Fill light’s technical function of contrast reduction has important aesthetic implications. To demonstrate the effect, Burum shot three versions of the workshop setup with different amounts of fill.
“The job of the fill light is to set the mood of the scene. Here we had a demonstration of no fill light, fill light that I thought was at the proper level, and fill light that I felt was a bit too bright. There is no correct amount of fill; it’s a matter of artistic interpretation.”
The progression of fill-light levels in the workshop footage provides a dramatic illustration of contrasting moods. Burum jokingly describes the brightest shot as the “Laverne & Shirley look.” Indeed, an audience might well associate this low-contrast image with a comedic theme. The middle image was measured to have a key-to-fill ratio of 8:1 (based on two incident readings, one toward the key and one toward the fill). The effect is bright but still modeled, and the frame still retains black references — in the actors’ hair, for example.
The no-fill image conveys a sense of foreboding that is absent from the other two scenes. Burum comments: “If you really wanted to be gutsy, you could turn off the key light on the actress, but then what would you do for close-ups? You should always keep coverage in mind. When you go from cut to cut, you try to maintain the same volume of light and dark in the frame. That’s why you have to light close-ups separately, but with a similar direction of light.”
Burum explains that fill light is a natural phenomenon. “Shadows are not inky black even on a sunny day, because they get natural fill from sunlight bouncing off the sky, clouds, buildings or ground.”
Fill light, he says, is usually placed as close as possible to the lens axis to avoid creating shadows. “You want to be able to fill in the shadows in a way that the audience won’t recognize. Old movie wisdom says that you don’t want to see a secondary shadow cast by fill light, mainly because it’s distracting.”
As with every other light but the key, Burum sets the fill by eye, and doesn’t measure the exposure ratio of the fill to the key. “I’m used to correlating in my mind what I see on the stage with what I see on the screen. The key-to-fill ratio is a good learning tool if you are a beginner, because it allows you to quantify what you see. But the more you do it, the less you need to measure. It’s like painting: how much blue and yellow do you use to get a certain green? If you’re just starting out, it’s two drops of blue to one of yellow. After a while, you just know the proportions instinctively — it’s ‘squirt-squirt.’ The same idea applies to cooking: Does it taste right, does it smell right?”
Burum feels that measuring the combined illuminations of key plus fill has little practical value. “If you were to take a reading in a very academic way, there is added light in the key area from the fill, but it is such a negligible amount that it’s not going to change the exposure.”
The placement of the fill along the camera-subject axis is critical to avoiding the creation of a new shadow in the image. A light directly behind camera makes the shadows cast by the fill less visible to the lens, because the illuminated object hides its own shadow. “You want the fill light on the camera’s axis,” Burum stresses. “If you don’t put it there, you start to cast a secondary shadow on the other side of the axis. Quite often, you’re hemmed in by the set, so you place it as close as possible to the camera. In those cases, you should fill from the key side if you have a choice, because that tends to wrap the shadow better.”
One of the problems with fill light, Burum warns, is that “you start to build up the background. Very often, you want a fill light that just goes out and dies, because you want to fill the people and not the walls.” Burum notes that this problem was highlighted in the bright, unpainted set used in the workshop. “If the set walls are lighter than normal skin tone, people will always seem dark by comparison. For people to stand out, the reflective value of the set should be below 25 percent. If it’s not, the actors’ faces will look dark even though they’re properly exposed, or you’ll spend a lot of time taking light off the walls. This is especially true when you have actors coming through doors, or standing against walls. It’s suicide. It’s always easier to put light on the walls than to take it off.
Burum cites “projected fill” as a traditional method of controlling unwanted bounced light. “It’s a classical approach in the old movies: You have this wonderful dark, mysterious set, but Bette Davis is always lit flatly in the foreground.” He adds that cinematographers of the era would place “1K Babies with snoots and silks on them directly over the camera to hide any secondary shadows, or they put them far enough from the wall so that the light died somewhere in Timbuktu. Often, several projected fills would be panned in and out with a dimmer to follow the actor.”
The cinematographer points out that he tends to avoid fill light in nighttime shots. “I don’t use fill light at night, because I want the shadows to be black. I don’t want to dilute the large volume of black; I want a complete absence of detail at night, with a good solid rich black. However, you can fill a shadow with a color. For example, you can use a little blue for a night scene.”
Although fill light lightens the shadows in a scene, Burum cautions against using fill to erase shadows. “The concept that the fill light erases shadows is very dangerous. Let’s say you have one light that casts a hard shadow, and you put in another light that casts a hard shadow. It’s true that the second light does wash out any density in the first shadow, but it’s also casting a second shadow. If you put in a third light to wash out the first two shadows, you now have three distinct shadow and highlight areas. It’s kind of like underpainting, when you paint over paint. Suddenly you have two little nose shadows, and it very subtly changes the detail of a person’s face. Try to use one or two lights to put the shadows in the right place. Don’t put a shadow in the wrong place and then try to erase it by adding another light.”
Burum’s systematic building-block approach to the workshop setup mirrors his own working practice. “The secret is that you have to have a method, a way of thinking about lighting. I have learned to think of lighting in such a way that it gives me the raw material I need to solve a problem. If you start to think of fill light as something that erases shadows, you’re already thinking the wrong way, and before you know it you have multiplied your problem.”
Referencing the lighting diagram above, Burum notes a practical side to the demonstrated approach. “You notice that all the lights that are lighting the walls are a back cross, so they don’t go across the set, so you can stick a microphone in the middle of it and you’re not casting any shadows,” he explains. “Also, the key lights are cut down to the top of the actors’ heads, so you have a shadow area where you can put the boom.”
The cinematographer stresses the importance of mastering the different styles of lighting. “Anyone who aspires to be an artist should know the history, try everything, and then find what works best for them.” And to today’s upcoming cinematographers, he offers this advice: “If you have a contrast problem, put in a little fill. It’s not going to kill you! After all, it’s the movies!”
Burum concludes with a plea for simplicity. “No matter how big or small the setup is, you want to use as few lights as possible. The lights are only going to accomplish three things: modeling, separation, or filling in the shadows. If you can’t look at the set and see that every light is doing something, then you should turn some of them off.”

+++